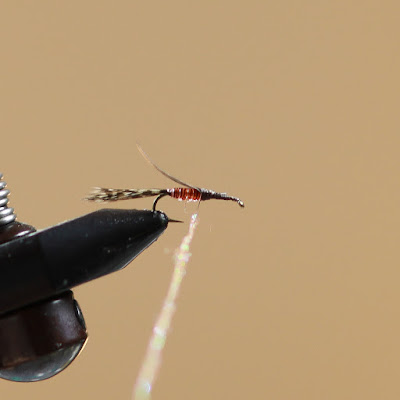
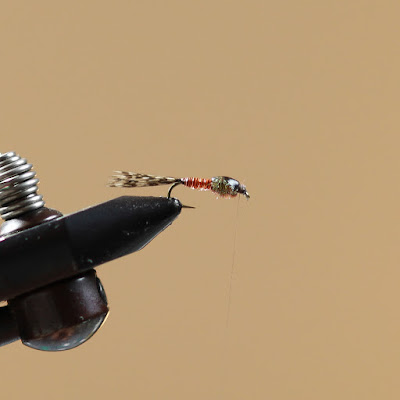
Quill Body Nymph- Hendrickson
This is a fly I have been tying now for a few years and using it during the early Spring and into the season as the hatches around here progress. It is a really simple pattern but I think it's damn sexy and has served me well. The UV resin coating is of course what brings it to life and I find myself using this stuff on most nymphs these days. I also love the Thin Skin as the wing case and another product I use alot of. I do tie these in a bead-head and non-bead version. The color I'm showing here does pretty well for the Hendricksons but I also tie a Sulpher #16 and a BWO #18 version. I just change up the colors and size of hook, otherwise, the tying is the same of course.
Like I said, nothing special here that I necessarily invented, just a sexy little nymph that catches fish. Play around with the colors and sizes and let me know what you come up with!
Brian Flechsig- April 2018
Quill Body Nymph Recipe:
Hook: Tiemco 5262 #14- Click Here
*of course any quality 2X long nymph hook will do the trick
#16 for the Sulpher and #18 for the BWO
Thread: 8/0 Uni Thread- Click Here
Ultra Thread 70 denier or Vevus 12/0 works fine also
Tail: Whiting Farms Coq DeLeon Hen Saddle- Click Here
Natural Brown on the Henny and Fl. Green Chartreuse on the Sulpher and BWO
Abdomen: Standard Quill Stem- Rusty Quill- Click Here
Rib: Fine Copper Wire- Click Here
* gold on the Sulpher and BWO
UV Resin: Loon Thin UV or equivalent- Click Here
Wing Case: Thin Skin- Mottled Bustard- Natural- Click Here
Thorax: Ice Dub- Golden Brown- Click Here
Optional Bead: Flymen Real Fly Beads- 1/8" Pink- Click Here
7/64" Caddis Green on the Sulpher and 3/32" Caddis Green on the BWO
Legs: Whiting Farms Coq DeLeon Hen Saddle- same as tail- Click Here
1. Start your thread as you normally do and wrap back to the bend of the hook. The thread should hang right at the barb.
2. Select a feather from the Coq DeLeon Hen Saddle and cut off "a bunch" of fibers to be used for the tail. This is usally a chunk about the same width as the hook gap to give an idea.
3. Tie in the tail at the bend of the hook using the pinch method. Wrap over the butts to secure and then wrap your thread back to the bend.
4. Tie in the thin Copper Wire at the bend, secure up the shank and again bring the thread back to the bend of the hook. This will be used as the rib over the quill body.
5. You should have your quills soaking as you begin tying. I usually let them sit in water for 5-6 minutes or so before I need them. Watch the video for a bit more on this. I then tie them in at the bend, just like you did the copper wire. Tie it in by the tip, thus it will give you a gorgeous, lifelike taper and segmentation effect. Where you tie it in on the quill will determine the "size" of your segments. Higher on the tip for smaller flies for example.
Now bring your thread forward to the mid point on the hook shank.
6. Wind the Quill Stem forward to the mid point of the hook shank making sure that each wrap is tight against the previous. Secure with your thread at there and trim the excess. May have to take a few wraps to lash-in and hide the trimmed butt.
7. Wind the Copper Wire over top of the Quill abdomen as your rib. Always nice to see an evenly spaced rib to accentuate the segmentation. Tie it off an trim the excess as you did the Quill.
8. Apply a thin coat of the UV Thin to the entire abdomen section and then hit it with your UV Light to cure.
9. Cut a thin strip of the Thin Skin, obviously long enough to be tied in and folded over as the wing case. The width of this strip should be slightly less than the gap of the hook. You will then trim one end to a point, which allows easier tie-in and also helps ensure that it doesn't bunch up at the rear where you fold it over.
10. Tie in the Thin Skin on top of the hook shank, right there at the mid-point of the hook shank. You can now also do a quick measurement to ensure that your proportions look good. If the abdomen seems a bit long and the thorax too short, simply wrap back over the thin skin and the abdomen, thus lenthening your thorax. I seem to do this quite often on these.
11. Dub the thorax with a thin thread of the the Ice Dub. Make sure to leave plenty of room behind the eye as you need to tie off the wing case yet as well as add the legs. Don't crowd the eye.
* If I'm doing a bead head version, I add some Ice Dub behind the bead then tie off the thread. I then re-start the thread in front of the bead and dub a bit more in front of the bead. This places the bead in the proper position with enough room in front as described above.
12. Fold the Thin Skin over the top to form the wing case. Secure with a few wraps of thread and make sure that you wrap back towards the bend as securing. This ensures that you don't cut your thread when you go to trim the excess right behind your thread. I often have to get my micro point scissors in on this to get the final little nubs of Thin Skin out of the way when I trim.
13. Apply more UV Thin to the Wing Case area and hit with your UV Light. I don't mind being generous with this as it creates a fantastic looking effect. You'll be blown away at how great this looks with the Thin Skin and Ice Dub "glowing" through!
14. Cut off another "bunch" of Coq DeLeon and you are now going to tie them in as legs. I do one bunch on the side of the nymph closest to me, and one bunch on the far side, of course using the pinch method. I usually rotate my vise a bit which makes the placement a bit easier. Once in place with a few wraps, you can adjust the length as well as make the two bunches fairly even, by pulling on the butts.
15. Once you have the length set, we are now going to position them in a downward slant. I do this by pinching and positioning them with my thumb and index finger. Hold them in the position you want while wrapping the thread back to secure. This again ensures that you don't cut your thread when you trim the butts. 3-4 wraps usually does the trick.
Using your Micro Point Scissors, trim the butts as close as you can.
16. Make a few more wraps of thead to clean up the head and cover the remaining butts. You can then finish the fly with your favorite method. As many of you know, I typically just use a few half-hitches and then a few dabs of head cement.
That's it! The Quill Body Nymph. This has become my "go-to" for Hendricksons, Sulphers and Blue Winged Olives. For the Sulpher I use the Fl. Green Chartreuse Coq DeLeon, Sulpher color Quill and Olive Ice Dub. For the BWO I use the same just switch the Quill color to the BWO.
Try this and let me know your thoughts. I think you're gonna love these....I know the fish do!!!
Watch the Video!
Mad River Outfitters/Midwest Fly Fishing Schools
Fly Shop, Fly Fishing Guides, Hosted Fly Fishing Travel, Schools, Classes and more!
813 Bethel Rd.
Columbus, Ohio 43214
614-451-0363
admin@madriveroutfitters.com


