Thursday, January 19, 2023

Friday Flies: Hollow Fleye by Pat Kelly


After a brief jungle hiatus (thank you covid) we finally made it back down to the Brazilian Rainforest. It's really difficult to sum up a trip like this using words and until you go yourself, you realize no words can do this fishery, environment, and indigenous people justice. Although Mad River Outfitters has been traveling down to Brazil for twenty years every trip seems like the first. There is always something unique and different about the fish depending on your location and water levels. One of the few constants are a few of the flies that have been consistent producers year after year. In this edition of Friday Flies we are showcasing the Bucktail Hollow Fleye. This "fleye" is the brain child of the one and only Bob Popovics. One of fly fishing's greatest of all time, not only as a teacher and contributor but as an all around exceptional human being. I am fully confident there is not a more simple but complex fly in all of fly tying. Anyone who has attempted to tie one of these flies can vouch for that! In its purest form it is simply bucktail and a hook, which is one of the reasons this fly and bucktail in general became my first true obsession in fly tying. Taking something so simple and turning it into something so spectacular really resonates with me. I've have been blessed with the opportunity to go down to Brazil several times and have fished dozens and dozens of different flies, made of both natural and synthetic materials and the Hollow Fleye takes the cake for me. If you haven't tied one then be sure to check out the step by step below and see the link to our YouTube Channel to watch our full feature video on the Hollow Fleye. It's nowhere near as good as Bob could do but he approved and that's good enough for me!     

Step 1: Place hook in the vise and lay down a base of thread from front to back.


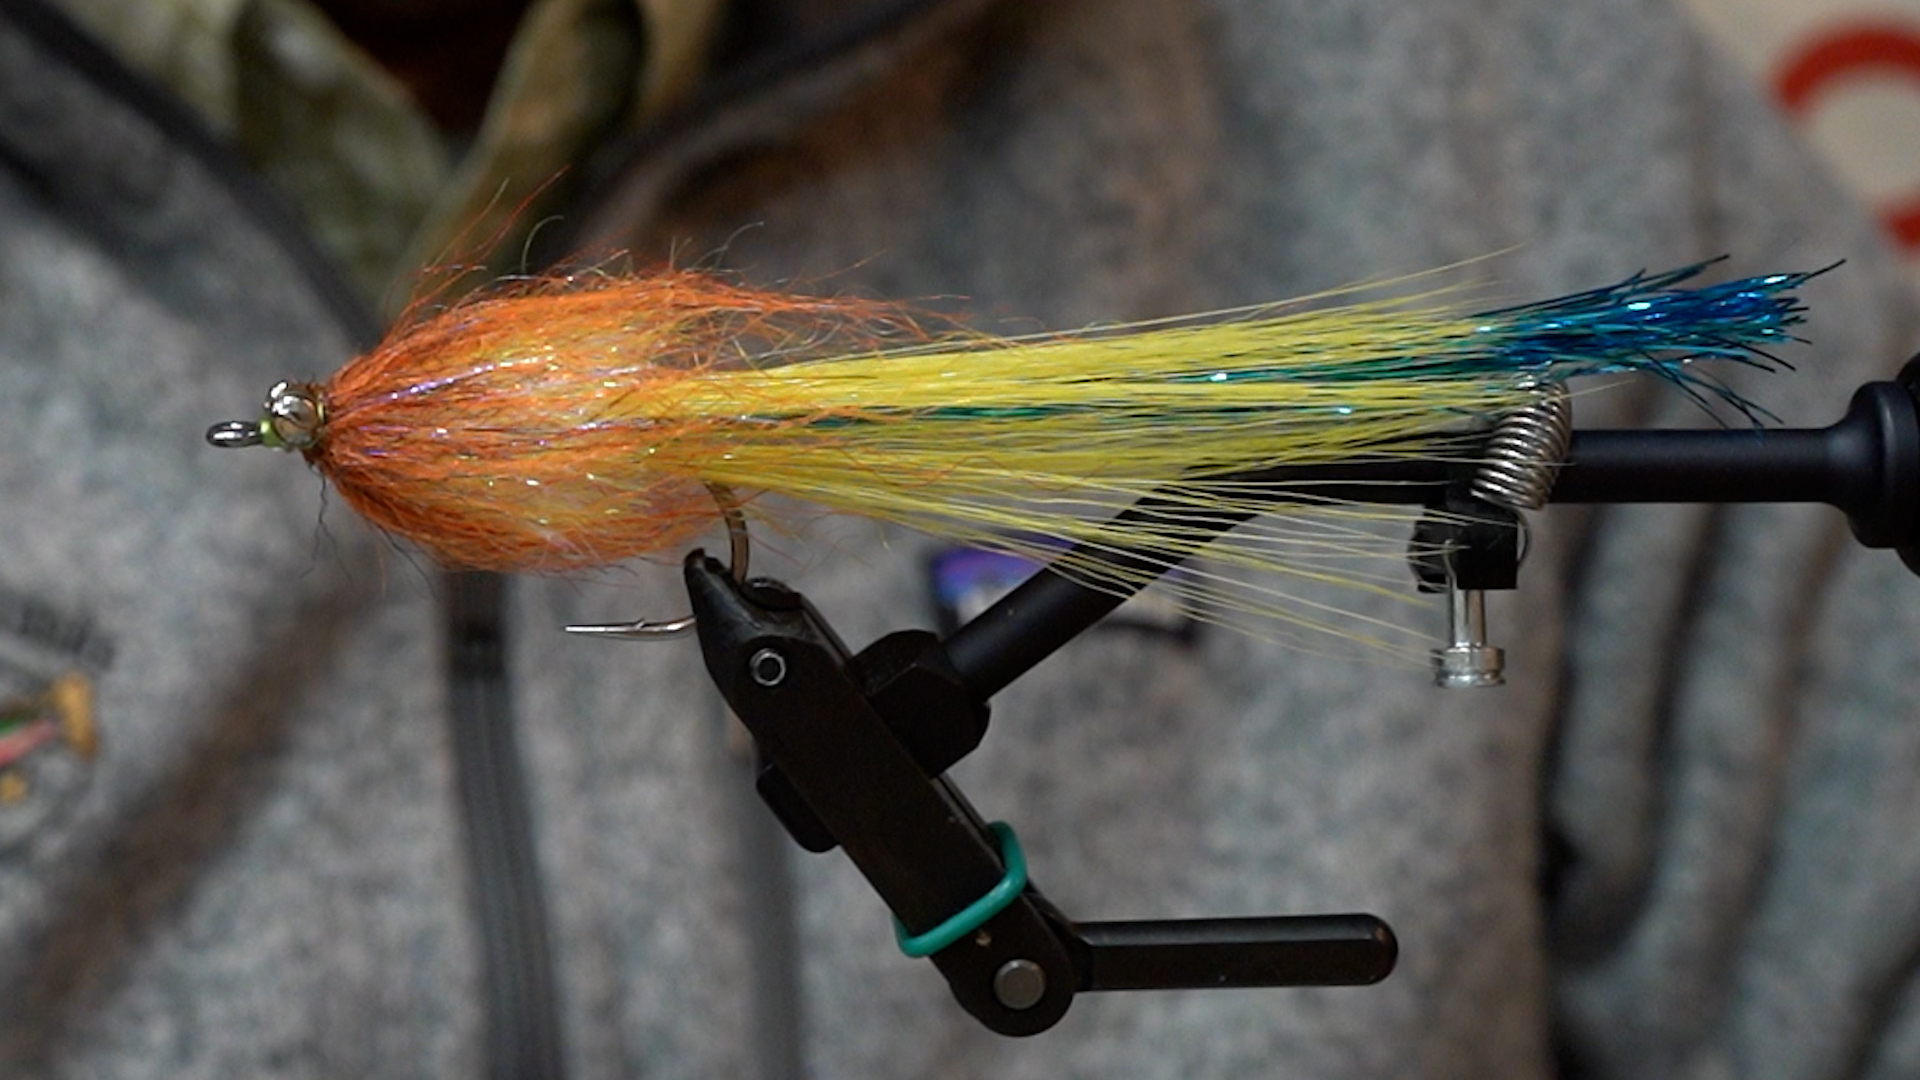
Step 2: Select a long bundle of bucktail, approximately 4-5 times the length of the hook shank. Tie in and secure so that your thread is hanging just behind the barb.


Step 3: Take a generous helping of flashabou, fold over thread and tie in directly above the tie in point for the tail. Ideally the longer section of flash should extend about 1/2-1 inch beyond the tail, providing more flash and movement to the tail. It is better to be generous with the flash as you can always cut it out if you feel it is not wanted by the fish.  


Step 4: Select your next bundle of hair. Be careful not to select too much, less is more! You'll want this section of hair to be approximately 75% of the length of the tail section. 


Step 5 wide: Once you have carefully measured your hair length, tie in so the tips of the bucktail are facing forwards. Make three loose capturing wraps around the butts. Take your thumb and fore finger and spread hair 360 degrees evenly around the hook shank and secure with tightening thread wraps.


Step 6: Using a push tool (empty pen casing works great) slide over the eye of the hook and up against the bucktail. Push the hair so that it is all facing rearward.


Step 7: Using your material hand, capture and hold down the hair while you lay down a dollop of 
Z-Ment and begin to build your thread dam. This dam will be the biggest (tallest) as you want the bucktail to lay at a pretty flat angle. The time to build height, shoulders, and shape will be in the coming sections. I can not stress enough to reinforce every step with super glue as it will prevent your fly from prematurely falling victim to Peacock Bass or any of the other countless predators swimming around the Amazon. 


Step 8: Just as in step 5, select another bundle of hair. This time you want your bundle to have a little more hair than the previous section. You'll want this hair to be approximately 80% of the previous section. You will follow this pattern/formula for the remainder of the way up the hook shank. The angle of each cone of bucktail should get progressively steeper as you move forward. This is what will bring shape and taper to your Hollow Fleye.


Step 9: Repeat step number 5 two more times. At this point you will have three hollow ties of white bucktail. 

I like to tie in grizzly accent feathers down each side of the fly. This step is a great way to add  contrast and depth to the the fly. Not only does this step make the fly look sexier but you will obviously catch way more fish compared to a fly with no accent feathers!


Step 10: At this point we are ready to tie in our last cone of bucktail. Just as before, tie in hair facing forward out over the eye of the hook. Secure butt ends with three loose wraps and spread hair evenly around the hook shank. Secure with strong tightening wraps and add another dollop of Z-Ment. Bring your thread through and in front of the bucktail and begin building your thread dam. Remember this dam will be the shortest of them all as you want to angle of this bucktail to be the steepest of all. Once finished, apply a generous amount of Z-Ment or UV resin to the thread head for durability.


The head can be any color you want. I have found having a bright contrasting color at the head not only triggers more Peacock's but will close the deal more often than if the fly is all one color.


If you have any questions in regards to tying this fly don't forget to watch this YouTube video as it will go into much greater detail than this article. Also, do not hesitate to call the shop if you want to speak to one of us directly.

Recipe: 
Cement: Z-Ment


Wednesday, January 18, 2023

SAGE Salt R8 Fly Rods


 SAGE Salt R8 Fly Rods


More fight, More touch!


Most salt rods are built for pure power and ultimate strength—that is table stakes for the venue and the discipline. With our new R8 graphite, adding 25% more strength-per-weight was the easy part—a simple function of material advancement—but one that also increased the fight in the rod even down to our six-weight. We increased the pure pulling power without the need to add more material, fillers or reinforcement. The outcome is simple, providing the ability for faster landing times and reducing fish stress and catch-and-release pressure on ever so delicate ecosystems.

More strength and fight were an obvious upgrade, yet few salt rods, especially in the heavier weights, achieve the importance of feel for fine touch shots and precise presentations. Shaping a taper that brought this increased touch into the equation took more time. Yet after a long residence in the birthplace of saltwater fly fishing, and working directly with the experienced guides there, our rod designers found the right profile and fiber alignment that delivered strength, fine touch presentation, and a more intuitive sweet spot to a class of rods that have long had a reputation as unwieldy, unforgiving and difficult. With the SALT R8, gone are the days of sacrificing the feel and touch in your saltwater rod.


* 25% Greater Strength Per Rod
* More Intuitive Sweet Spot and Touch
* Saltwater Specific Guide Set
* Heavy-Duty Reel Seat


833 Bethel Rd.
Columbus, Ohio 43214

614-451-0363

Monday, January 9, 2023

Jerry Darkes Fly Tying Classes


Jerry Darkes Fly Tying Classes

Saturday, February 11th
Saturday, February 25th
Saturday, March 11th


We are thrilled to have special guest tyer Jerry Darkes offering a series of classes based on his popular book, "Essential Flies for the Great Lakes Region". He will be conducting three "masterclasses" at the shop this Winter. Register for one or take them all!

Jerry Darkes has been a friend and supporter of Mad River Outfitters for nearly 30 years. He is a fly tackle sales rep, instructor/guide, and writer with over four decases of and is recognized as an expert of Great Lakes steelhead and warmwater fly fishing. 


Top Steelhead Flies

Saturday, February 11th, 2023. 11 a.m.- 4:00 p.m. at the shop


Patterns Covered:

Drift Patterns
* Sucker Spawn/Egg Cluster Fly- variations explored
* Steelhead Stone
* Dr. Mike's Caddis

Swing Patterns- will show on both shanks and tubes
* Grapefruit Head Leech
* Marabou Spey
* Crafty Leech


Register for this Class HERE!


Top Trout Flies


Saturday, February 25th, 2023. 11 a.m.- 4:00 p.m. at the shop


Patterns Covered:

Nymphs
* Pink Squirrel
* Bob's Swimming ISO

Dry Flies
* McCoy AP Dun- Brown Drake
* Regan Spinner- Rusty Spinner
* Sandwich Beetle/Cricket


Register for this Class HERE!


Top Streamer and Warmwater Flies


Saturday, March 11th, 2023. 11 a.m.- 4:00 p.m. at the shop


Patterns Covered:

General Purpose Streamers- Trout and Warmwater
* Circus Peanut

Bottom Crawler
* Rough Dub Crayfish

Sub-Surface
* Bad Hair Day
* Rabbit Diver

Surface
* Gurgler
* Foam Popper


Register for this Class HERE!


* Students are required to bring their own vise, basic tools and appropriate threads (exact listing will be provided)


** Mad River Outfitters/Midwest Fly Fishing Schools will provide the hooks and materials for each pattern 

** Previous tying experience and basic fly tying skills are recommended for these classes

**Class is limited to 10 students. We will break for 1/2 hour around 1:00 p.m.

Please give us a call at the shop if you have any questions. 614-451-0363


833 Bethel Rd.

Columbus, Ohio 

admin@madriveroutfitters.com

www.madriveroutfitters.com

Friday, January 6, 2023

Friday Flies: Whistler

 Friday Flies: Whistler by Ryan Ratliff

Whistler tied by Ryan Ratliff.

In preparation for our Brazil Peacock trip I set out to make an already productive fly better. Flies for the Amazon river basin need to be durable and get the fishes attention. For years the simple Whistler fly has been a staple on this trip. The fly is easy for any angler to cast and fish no matter the skill level. The Whistler is not going to win any beauty or artistic fly design contests though. Despite its looks it is a great choice when trying to quickly fill a box with flies.

One of the issues we have with the original patterns is the durability. The original consists of a flash and bucktail tail, saddle hackle & Krystal flash flanks, chenille body, schlappen collar, and bead chain eyes. Flashabou is great, but it is very soft and flowy. The flash tail tends to fowl around the hook and break off easily. Combine the long flash and bucktail with the viciousness of a Peacock Bass and there is often a cloud of fly parts in the water as you land a fish. The other issue comes from another species. Piranha destroy flies. If you do not strip fast enough or you pause to untangle, all you feel is a slight tap and half of your fly is gone.

Knowing the durability issues I set out to create something to fix a few problems. Clients were catching only a few fish before the fly was destroyed. We brainstormed a more durable replacement for each component of this fly. Although nothing replaces the properties of natural bucktail, the tail of the fly was used to protect the flash and create bulk. A stiff synthetic could replicate all of these needs easily. Faux Bucktail used here comes from the mind of Martin from Flymen Fishing Company. It is not a replacement for all uses of Bucktail, but it works very well here. Combine reinforcing the flash with flexible resin and we were checking off the boxes we needed. The schlappen collar was also an issue as it would unwrap or the stem would break. The obvious solution came from our love for brushes. Flash blend brushes from Just Add H2O have the right amount of stiffness, flash, and come in a large range of colors. The longer EP Senyo's Chromatic Brush (3") helped to blend the collar and body together and add some movement. I could not get myself to add chenille to a streamer of this caliber. Make your own opinions of those thoughts, but I felt it needed to be a more modern material. Filler Flash provided bulk, flash, and is a staple for props on modern flies. When wrapped over glue it was bombproof. Bucktail can become brittle when coated with thick amounts of glue, but synthetics fuse together and become more durable. Excessive amounts of glue keep the synthetics locked together and lasting for many battles with Peacocks!

Below is Ryan's step-by-step on how to tie the Whistler pictured above. The full list of materials can be found below.

Step 1: Place hook in vise.


Step 2: Start thread and mount lead eyes. Coat all thread with Z-Ment or Brushable Super Glue.


Step 3: Cut a thick stack of Flashabou and fold in in half over your thread. Slide it down the thread to the hook shank and tie off securely. Place Flashabou in the material keeper and coat all thread with more glue.


Step 4: Coat about one hook shank length of the Flashabou with Solar Ez Flex Resin. Make sure to not just cover the top/outside of the bundle, but also inside the bundle. Set the resin with a powerful UV light. After shining the light on all sides check to see if it is tacky. If so then repeat until it is no longer tacky.


Step 5: If the glue is dry over your thread wraps give it another coat. Cut a decent bundle of Foux Bucktail. Trim it so that it fits from the lead eyes to about an inch from the end of the flash. Lay the Foux Bucktail down into the wet glue. Tie it down onto the hook with crisscrossing thread wraps. Keep the “Bucktail” on the top of the hook.


Step 6: Rotate the hook so it is point up and coat the thread wraps with glue. Cut a stack of Foux Bucktail about half the amount of before, trim, and place on the near side of the hook. Use just enough wraps, one or two, to hold it in place. Coat these new wraps with more glue. Repeat the process but on the far side of the hook. Use a few wraps of thread to secure both sets of ‘tail. All of the Foux Bucktail should encase the Flashabou evenly. Coat the area over the thread and slightly onto the Foux ‘tail with more glue.


Step 7: Tie in the tip of the Filler flash at the back of the visible thread wraps.


Step 8: Palmer the Filler Flash forward over the wet glue making sure not to get glue on too many of the fibers. Palmer forward to a hook eye length behind the eyes. Tie off and glue that point.


Step 9: Tie in the orange 2” Flash Blend Brush by the wire tip. Wrap tight side by side wraps of the brush. Tie off the brush and trim the wire flush. Of course, now add more glue to that point. Using the Loon Ergo brush, comb out any trapped fibers evenly around the fly.


Step 10: Still behind the lead eyes tie in the EP 3" Senyo's Chromatic Brush brush by the tip. Make one or two touching wraps side by side.


Step 11: Trim off the brush flush. Carefully placed a few wraps of thread over the sharp cut brush end. Coat the tie off point with a good amount of glue. It is best if the glue slightly soaks into the face of the brush.


Step 12: Advance your tread to the hook eye, whip finish and glue.


Step 13: Once the glue is dry apply UV resin over all of the exposed thread. Brush the fibers back with the comb evenly and you are done.


Recipe