Friday Flies: Whistler by Ryan Ratliff

Whistler tied by Ryan Ratliff.
In preparation for our Brazil Peacock trip I set out to make an already productive fly better. Flies for the Amazon river basin need to be durable and get the fishes attention. For years the simple Whistler fly has been a staple on this trip. The fly is easy for any angler to cast and fish no matter the skill level. The Whistler is not going to win any beauty or artistic fly design contests though. Despite its looks it is a great choice when trying to quickly fill a box with flies.
One of the issues we have with the original patterns is the durability. The original consists of a flash and bucktail tail, saddle hackle & Krystal flash flanks, chenille body, schlappen collar, and bead chain eyes. Flashabou is great, but it is very soft and flowy. The flash tail tends to fowl around the hook and break off easily. Combine the long flash and bucktail with the viciousness of a Peacock Bass and there is often a cloud of fly parts in the water as you land a fish. The other issue comes from another species. Piranha destroy flies. If you do not strip fast enough or you pause to untangle, all you feel is a slight tap and half of your fly is gone.Knowing the durability issues I set out to create something to fix a few problems. Clients were catching only a few fish before the fly was destroyed. We brainstormed a more durable replacement for each component of this fly. Although nothing replaces the properties of natural bucktail, the tail of the fly was used to protect the flash and create bulk. A stiff synthetic could replicate all of these needs easily. Faux Bucktail used here comes from the mind of Martin from Flymen Fishing Company. It is not a replacement for all uses of Bucktail, but it works very well here. Combine reinforcing the flash with flexible resin and we were checking off the boxes we needed. The schlappen collar was also an issue as it would unwrap or the stem would break. The obvious solution came from our love for brushes. Flash blend brushes from Just Add H2O have the right amount of stiffness, flash, and come in a large range of colors. The longer EP Senyo's Chromatic Brush (3") helped to blend the collar and body together and add some movement. I could not get myself to add chenille to a streamer of this caliber. Make your own opinions of those thoughts, but I felt it needed to be a more modern material. Filler Flash provided bulk, flash, and is a staple for props on modern flies. When wrapped over glue it was bombproof. Bucktail can become brittle when coated with thick amounts of glue, but synthetics fuse together and become more durable. Excessive amounts of glue keep the synthetics locked together and lasting for many battles with Peacocks!
Below is Ryan's step-by-step on how to tie the Whistler pictured above. The full list of materials can be found below.
Step 1: Place hook in vise.
Step 1: Place hook in vise.

Step 2: Start thread and mount lead eyes. Coat all thread with Z-Ment or Brushable Super Glue.

Step 3: Cut a thick stack of Flashabou and fold in in half over your thread. Slide it down the thread to the hook shank and tie off securely. Place Flashabou in the material keeper and coat all thread with more glue.

Step 4: Coat about one hook shank length of the Flashabou with Solar Ez Flex Resin. Make sure to not just cover the top/outside of the bundle, but also inside the bundle. Set the resin with a powerful UV light. After shining the light on all sides check to see if it is tacky. If so then repeat until it is no longer tacky.


Step 5: If the glue is dry over your thread wraps give it another coat. Cut a decent bundle of Foux Bucktail. Trim it so that it fits from the lead eyes to about an inch from the end of the flash. Lay the Foux Bucktail down into the wet glue. Tie it down onto the hook with crisscrossing thread wraps. Keep the “Bucktail” on the top of the hook.

Step 6: Rotate the hook so it is point up and coat the thread wraps with glue. Cut a stack of Foux Bucktail about half the amount of before, trim, and place on the near side of the hook. Use just enough wraps, one or two, to hold it in place. Coat these new wraps with more glue. Repeat the process but on the far side of the hook. Use a few wraps of thread to secure both sets of ‘tail. All of the Foux Bucktail should encase the Flashabou evenly. Coat the area over the thread and slightly onto the Foux ‘tail with more glue.


Step 7: Tie in the tip of the Filler flash at the back of the visible thread wraps.

Step 8: Palmer the Filler Flash forward over the wet glue making sure not to get glue on too many of the fibers. Palmer forward to a hook eye length behind the eyes. Tie off and glue that point.

Step 9: Tie in the orange 2” Flash Blend Brush by the wire tip. Wrap tight side by side wraps of the brush. Tie off the brush and trim the wire flush. Of course, now add more glue to that point. Using the Loon Ergo brush, comb out any trapped fibers evenly around the fly.


Step 10: Still behind the lead eyes tie in the EP 3" Senyo's Chromatic Brush brush by the tip. Make one or two touching wraps side by side.

Step 11: Trim off the brush flush. Carefully placed a few wraps of thread over the sharp cut brush end. Coat the tie off point with a good amount of glue. It is best if the glue slightly soaks into the face of the brush.

Step 12: Advance your tread to the hook eye, whip finish and glue.

Step 13: Once the glue is dry apply UV resin over all of the exposed thread. Brush the fibers back with the comb evenly and you are done.
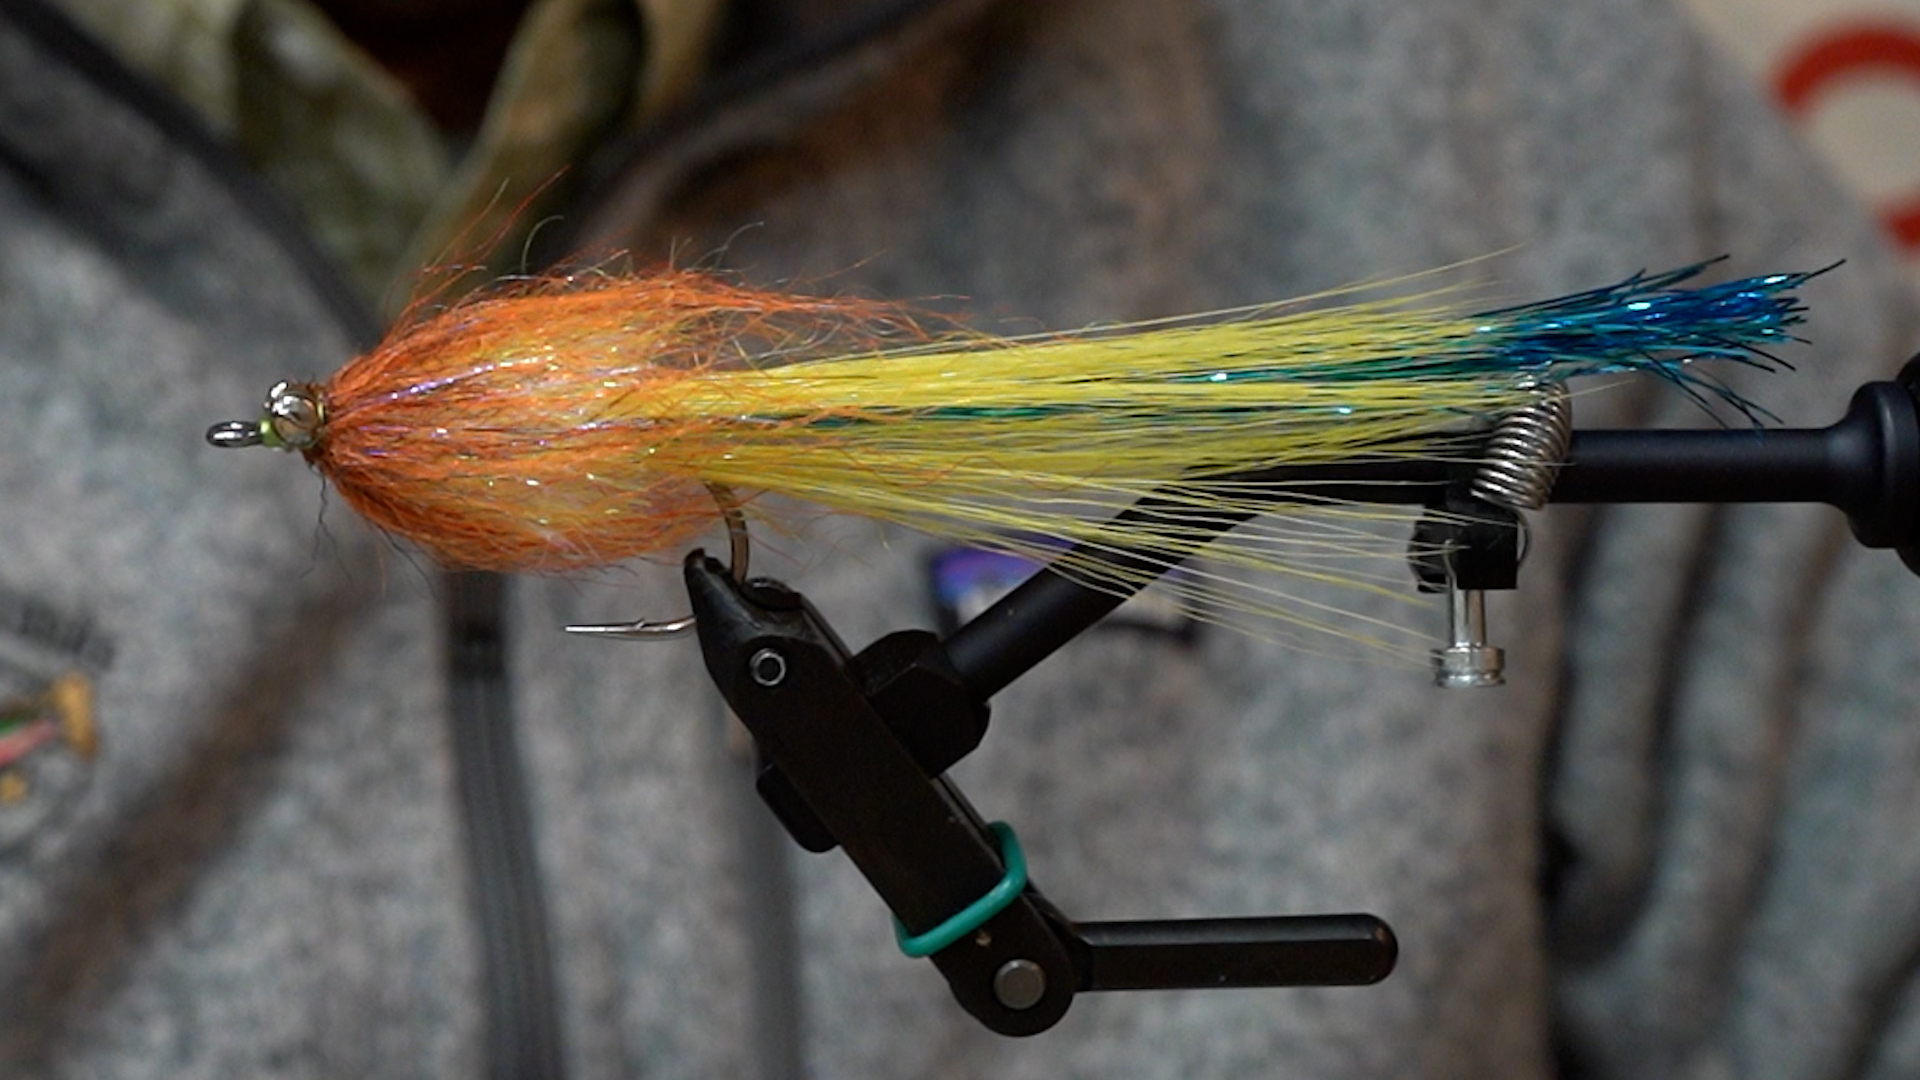
Recipe
Thread: Chartreuse Power Thread
Tail 1: Royal Blue Flashabou
Body 1: Filler Flash in Pearl
Body 2: 2” Flash Blend Brush in Orange
UV Resin: Solar Ez Flex Resin
UV Light: Loon Plasma Light