Showing posts sorted by relevance for query tutorial. Sort by date Show all posts

Friday, December 9, 2022

Friday Flies: Leggy Boi

"Leggy Boi" 


Big shout out and thank you to Mike Schultz and the crew at Schultz Outfitters for developing this pattern and continually pushing the boundaries of warmwater fishing and the patterns we use. 

The Leggy Boi can be tied in a limitless amount of color variations and color combos. Try not to get caught in the generic white colorway. Often times the more adventurous you get with different color combos, the more fun the outcome. With nearly endless colors available in feathers, brushes, props, and rubber legs, you are only limited by your imagination. 

Mike has a great video tutorial on his YouTube channel for this fly (as well as countless others that I highly recommend watching). It is full of great tips and tricks as it pertains to both how he ties and fishes this incredible fly. 

Below is our step-by-step on how to tie the Leggy Boi. The full list of materials can be found below.

1. Select one or two marabou plumes and tie off the back. Try to keep the length generous as you want this fly to move and swim as much as possible.


2. Take one full strand of legs and fold around thread creating a pair and tie in on either side of hook. Repeat on other side of hook.


3. Select two hen saddles near the top of the saddle where you will find the smaller feathers. Tie the feathers in and wrap up the remainder of the shank as you would on a Feather Changer (see Feather Changer tutorial video here) and tie off.


4. Insert second 15mm shank into your vise and tie in the prop material. Here we happen to be using the 1" Translucy Brush trimmed down slightly. Wrap the brush forward until you are a little past half way on the shank and tie off.


5. At this stage we will select two full length strands of rubber legs. Fold in half as we did previously and tie down. Repeat this step on the far side of the fly as well. 


6. Finish the remaining shank by selecting two more hen saddles and wrap forward to the eye. This time you want to make sure you grab feathers that are a little bigger than the previous pair as to begin building shape and taper to the fly.


7. Insert hook and attach the two shanks, either with a shank or by using articulation wire. 


8. Repeat the same steps as we did on the previous section. Tie in 1" Translucy Brush, wrap forward a little beyond half way and tie off. Trim down a little so that the prop is not at full length but bigger than the previous shank. After this tie in two legs folded in half on both the near and far side of the hook. 


9. Once the legs are tied in, you will select two more hen saddles, slightly larger than before. Tie in and wrap forward covering the remainder of the shank.


10. After the first hook is completed you will insert the 25mm shank into the vise and repeat the steps exactly as we did in previous sections. Only difference here is you will be building two stations on this shank instead of one. The prop on the first station will be the 1" Translucy Brush but left at full length. The second station you will switch to the 2" Translucy Brush but trimmed down to be a little longer than the previous station.


11. Insert the Ahrex SA280 hook and before attaching the previous section, slide the Slotted Tungsten Bead up onto the hook then proceed to attach the previous section. 


12. As we did on previous shanks, attach the 2" Translucy Brush and wrap 3/4 of the way up to the bead and tie off. Select three large hen saddles. If you do not have anything wide or big enough for the task, feel free to use bigger schlappen feathers as a substitute here. After this step you can go right to the EP Crustaceous Brush or add an accent color first, totally up to you.


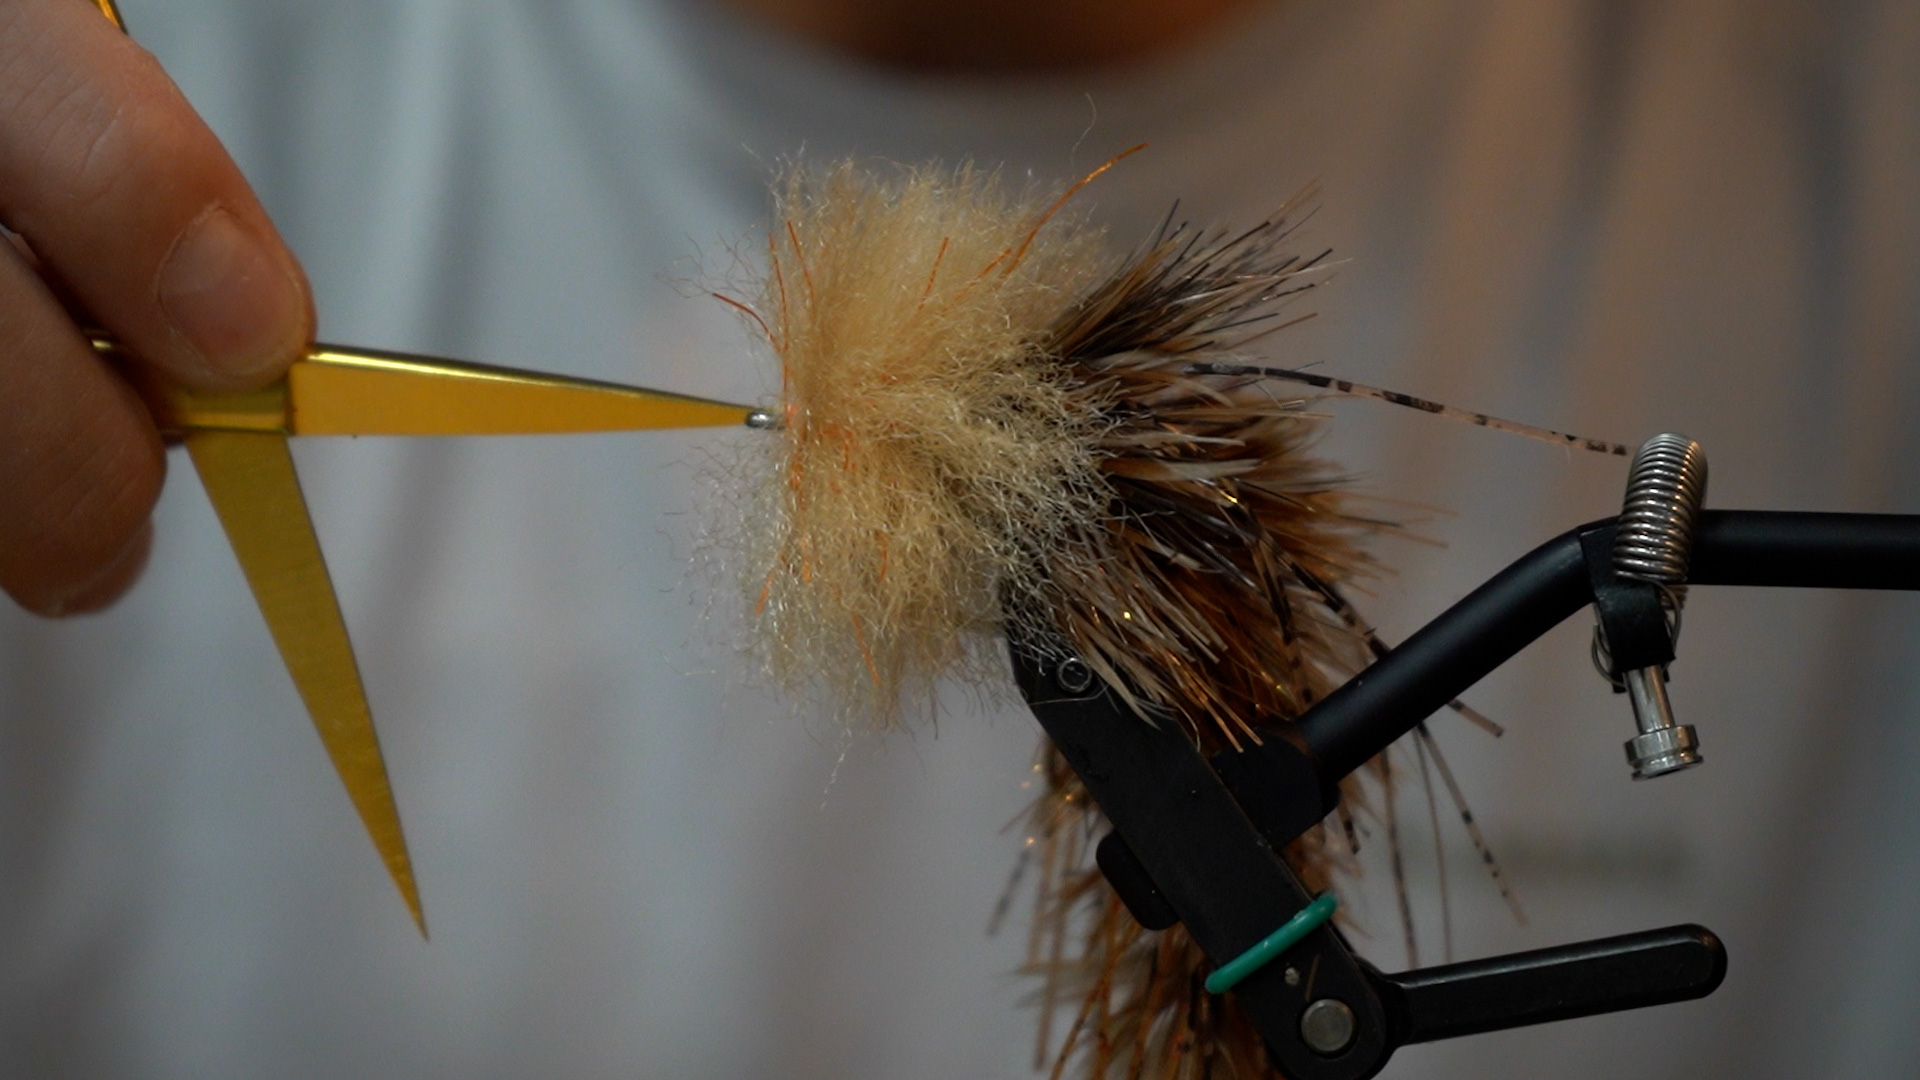
13. Tie in the EP Crustaceous Brush and wrap forward all the way up to the eye of the hook. The amount of wraps and density is completely up to you and what you want out of the fly. Comb fibers out as much as possible. Begin to trim down and shape the head to your likening.  


Have any questions on tying this fly? Give us a call at 614-451-0363!

Sunday, October 6, 2019

Sandwich Cricket: Fly Tying Tutorial

We brought in Jerry Darkes on the YouTube Channel to give you a brief tutorial on how to tie the Sandwich Cricket.


Sandwich Beetle by Jerry Darkes


Materials
Hook: TMC 5212 size #10
Thread: UTC 70D, black
Underbody: Dry fly dubbing in black
Foam: 2mm foam sheeting, black with a brighter color such as orange or yellow. Glue together as a single sheet using a spray adhesive. Cut into strips between 1/8”–¼” (4mm-5mm) wide.
Legs: Montana Fly Company Barred Sexi Floss- medium size, in olive, tan, or brown.

Tying Steps

1. Start the thread and lay a thread base on the hook shank. Take the thread to the bend of the hook.
2. Lay a length previously prepared foam strip over the top of the hook with the back end extending slightly past the bend of the hook.
3. Make few wraps over the foam, then gradually increase pressure while making more wraps to hook the foam on top of the shank. Be sure to keep the foam strip on top of the shank.
4. Finger dub several inches of body dubbing on to the thread.
5. Dubbing completed.
6. Lift up the foam and start wrapping the body.
7. Wrap the body to just behind the eye of the hook, then pull down the foam strip and secure to the top of the hook with additional thread wraps.
8. Trim off the foam sticking out to the front leaving a short length extending past the hook eye.
9. Completed body.
10. Cut a 2” length of the medium Barred Sexi Floss. Double that over and cut to a 1” length. Tie this in the middle on one side of the body.
11. Tie in the other 1” Barred Sexi Floss on the other side of the body.
12. Trim each side to 4 or 5 barred sections in length.
13. Take the thread to the front of the body, tie off and cut the thread. Restart the thread where the back part of the foam is tied down.
14. Repeat the same procedure for prepping and tying in the rear legs as in front. Tie in one side. 15. Then tie in the opposite side.
16. Trim the legs to length then whip finish and cut the thread.
17. Put a touch of glue at each point where the legs are tied down.
18. The finished Sandwich Cricket. The bright foam on the top allows the fly to be easily seen on the water.

Check out this video from Brian Flechsig last year on using beetles and crickets for trout!

Sunday, September 3, 2023

Keep Sharp, The Cornerstone to a Successful Day on the Water

Fly fishing anglers will often hear fly fishing pundits emphasize the importance of their rod, reel, or even their fishing attire. Yet, Brian Flechsig of Mad River Outfitters and the Midwest Fly-Fishing Schools brings our attention back to two pivotal elements - the fly and the leader. These are arguably the most crucial pieces of a fly fishing setup. In his words, "Nothing matters if your fly sucks." Brian stresses that even if you have the right fly, if your leader can't present it naturally, it's still ineffective.

Mad River Outfitters hook sharpener tutorial, Dr. Slick Hook Sharpener

The heart of Brian’s argument is the significance of a sharp hook. The hook is where the angler meets the fish, the ultimate point of contact. If it doesn't penetrate the fish's jaw properly, all else is rendered moot. 

Many overlook the necessity of maintaining sharp hooks. Conventional anglers regularly sharpen their hooks, but fly anglers seem to neglect this essential practice. Some even opt to just cut back their tippet to switch out flies. With fewer hooks on their line than conventional anglers, fly fishers should be even more diligent about their hook's sharpness.

Brian Flechsig from Mad River Outfitters sharpening a hook on a Dr. Slick Hook Sharpener

To help anglers maintain their hooks, we recommend the Dr. Slick Diamond Hook Hone. These tools come with different grit levels for refining the sharpness of the hook, making the sharpening process straightforward and efficient. Brian provides a detailed demonstration on how to use these sharpeners, emphasizing filing away from the hook point for best results. The "thumbnail test," a method taught to him by his grandfather, is a simple way to check the hook's sharpness. If it grabs onto your thumbnail, it's sharp enough.

Mad River Outfitters hook sharpening tutorial with fly fishing hook sharpener


In conclusion, while many factors contribute to a successful fly-fishing experience, the sharpness of the hook can make or break your day on the water. No matter the quality of your other equipment, a dull hook can thwart your chances of catching fish. As Brian aptly puts it, "Your hook is your point of contact." Keeping it sharp ensures that when the moment comes, you're fully prepared.


Thursday, January 31, 2019

Fly Tying- Blane Chocklett's Feather Game Changer


Chocklett's Feather Game Changer

The “Game Changer” whether you are referring to the fly or its creator Blane Chocklett, the name is fitting.

In the world of fly tying, it is not very often something truly game changing comes around. When Blane first introduced the pattern 5-6 years ago, it was tied using a chenille/brush type material called Body Fur. Now the pattern is tied using a number of different natural and synthetic materials. In this step by step we will be tying a variation of the Feather Game Changer.

This particular version lends itself well to flies in the 4-6” range. This variation has become a staple for us over the past few years for Smallmouth, Stripers, Steelhead and even Bowfin. Once you have fished any version of the Game Changer it is hard to go back to any other fly as they are so much fun to tie an fish and they flat out get the job done!


Feather Game Changer Recipe:

Body: Articulated Fish Spines: 10mm and 15mm- Click Here
Middle Hook: Ahrex NS172 Gammerus #4- Click Here
Front Hook: Gamakatsu SL12S Short #1/0- Click Here
Tail: Whiting American American Saddle- white Click Here or Strung Marabou- white- Click Here
Body Material: Whiting American Hen Saddle- Click Here or Whiting Coq De Leon Hen Saddle- Click Here
Head: Contrasting color of the above mentioned feathers (optional)
Prop Material: Chocklett’s Filler Flash- pearl and gray- Click Here
Thread: UTC 140- white or GSP 100 denier- white- Click Here
Cements: SolarEz Bone Dry UV Resin- Click Here and Zap-A-Gap Brush On- Click Here or Hard as Hull- Click Here


Step 1: Insert 10mm Spine into vise. Lay down an even base of thread from the eye to as far back on the shank as possible so that you can maximize the amount of usable space on the already small platform.


Step 2: Tie in Filler Flash and palmer material forward with tight side by side wraps. Bring the material almost all the way forward, leaving roughly one eye width remaining from the actual eye of the shank. Secure and trim excess. 


Step 3: After tying off the Filler Flash tie in four saddle tips in total. You will want to tie these feathers in evenly around the shank. I find its easiest to tie in two feathers at the top each at a 45 degree angle and the same on the bottom. This will give you a tent like appearance or a “V” on both sides of the shank.


Step 4: Attach second 10mm spine to the first and insert into vise. Just as before you will want to start your thread right at the eye and wrap back as far on the shank as possible. You may find it helpful to brush on a little Zap to help give the thread traction. **You will want to bring your thread back far enough to leave just enough room in the loop of the shank to allow the previous shank to swing side to side without hanging up. Doing so will limit the amount of gap you have between sections, giving the fly the illusion of being one piece. 


Step 5: Cut away a few fibers of the Filler Flash exposing the core. This will allow for a very secure and clean tie in point. 


Step 6: Palmer Filler Flash forward to just behind the shanks eye and secure.


Step 7: Select three feathers from the top of the saddle. (The feathers from this part of the skin are the smallest and most narrow.) Marry all three feathers together by laying them evenly one on top of the other. Hold the tips in one hand and preen the fiber downward toward the base of the stem. Trim the excess material at the top of the feathers leaving a small tab. Using that tab tie in feathers with the concave side facing the tail of the fly. This will ensure all the fibers will flow backwards when palmering them forward. Wrap feathers forward covering up the remaining portion of the shank and tie off.


Step 8: Attach third 10mm spine and secure in the vise. At this point you are going to repeat everything in step 7.


Step 9: Secure Ahrex hook into vise. Secure thread just behind the eye of the hook and wrap thread back to about 1/3 the way down the bend of the hook then return thread back up so that it rests between the barb and the point of the hook. At this point attach rear portion of the fly to the hook using a fish spine with the eye cut off or using Senyo’s Intruder wire. If using wire make sure the loop is situated on top of and in line with the hook shank, leaving just enough of an opening so that the fly can swing freely but not be hindered in any way. Lay on a coationg on brush on super glue and lock down with very tight securing wraps up and down the hook shank. 


Step 10: Tie in Filler Flash and palmer forward to the halfway point on the fly and tie off.


Step 11: Just as before we are going to select three hen saddles. This time you will want to select them from a little further down the skin. This will ensure they are a little wider and larger which will help us start to form shape and taper in the fly. Palmer feathers forward all the way to the eye of the hook. Add glue and tie off.              

                                                                                                                                
**From this point on in the fly each group of feathers should come from a little farther down on the skin at each stage of the fly moving forward. As stated above this will be how we form shape, taper and density into the fly, which is crucial to achieve the desired profile and swimming action**  


Step 12: Attach hook to the first 15mm Fish Spine. Secure thread behind the eye and wrap an even thread base to the rear of the shank. Tie in Filler Flash and make very dense side by side wraps up to the halfway point on the shank and tie off. Select the next group of feathers, tie in and palmer forward until you reach the eye of the shank. Whip finish and glue. 

Attach the second 15mm spine and repeat the same steps as with the previous 15mm spine.


Step 13: Attach 15mm spine to the front hook using the same technique used to attach the middle hook. 


Step 14: Tie in Filler Flash and palmer forward to about the half way point on the hook shank. Try to get as many wraps as possible in this step. Use as much tension as possible when wrapping the Flash forward. This will cause the material to stand off the hook shank as straight as possible maximizing its ability to prop the feathers up at a steeper angle as to increase profile and taper. 


Step 15: This next is totally optional but I wanted to include it in the step by step because I forgot to add this in on the video tutorial. In these two images you will see hen saddles or hackle tips being added in as pectoral fins. Although this step is not completely necessary I personally include them on all of my patterns. The most important benefit to this step is that it will be adding to the realism of the fly significantly. Because most all predatory fish view their prey first from below this will further sell your offering by showing the fish one of the more noticeable features on a fish. On a fly like this you are not really increasing the time or difficulty of the pattern by including them on there so why not?


Step 16: After tying in your pectoral fins to either side of the fly you will be ready for your last step. Now to complete the fly you will tie in and palmer feathers just as before but at this stage you will need to use two groups of three feathers in this portion for two reasons. First is to take up the extra space on the hook shank and secondly to add density to the head of the fly. A streamers ability to swim starts with the head of the fly. The diversion of water around the head of the fly is what starts the swimming action of the fly. The denser the head the greater diversion or deflection of water.


Wrapping Things Up: If you have not attempted tying any of the Game Changer style of flies before I highly encourage you to do so. Although it may not be as easy and quick to tie as a Clouser Minnow it’s effectiveness and durability combined with the fact that it is downright fun to fish should make for a compelling argument. There is a reason why this style of fly has taken the tying industry by storm it flat gets it done. 

If you think of the Game Changer as a platform and not just one specific way to tie a fly and with only one material the possibilities are endless. With all of the materials now available to us as fly tyers you are only limited to what you can conjure up in your head. In the coming months I will be doing a series of videos and step by steps highlighting just some of the many ways you can tie a Game Changer. If there is variation you would like to see done let us know and we will do our best to make it happen.


As always if you have any questions on this tutorial do not hesitate to call or email the shop. 

-Pat Kelly- January 2019


Watch the Video:


Mad River Outfitters/Midwest Fly Fishing Schools

Fly Shop, Fly Fishing Guides, Hosted Fly Fishing Travel, Schools, Classes and more!

813 Bethel Rd.
Columbus, Ohio 43214

614-451-0363

admin@madriveroutfitters.com