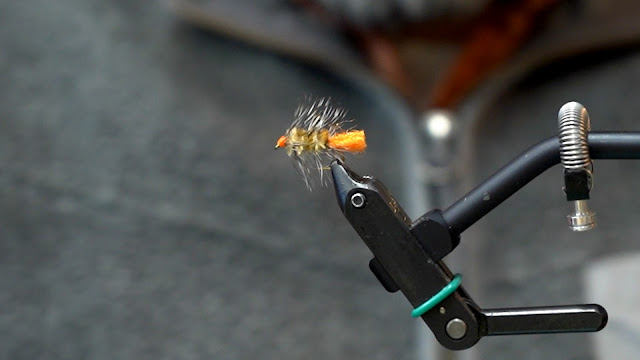
The Wooly Worm is a staple in my fly box for many different species. Basically, it is a Wooly Bugger with a yarn tail. This fly is simple and productive! In the right colors this fly can replicate anything from mulberries to fish eggs, to Zooplankton clusters. Although it catches many species, Bluegills are my favorite fish by far. Any panfish for that matter seldom let you down by turning up their nose to an improperly presented fly. You can either match specific food like Dragon Fly nymphs or use this as an attractor in fluorescent colors.
The Wooly Worm can be fished in many different water columns. Fish it near the surface by not adding weight and using a light wire hook or add a few wraps of lead wire to fish it deeper. In this tutorial, we picked a slightly heavier hook to help the fly sink slowly. Often I find that our flies will sink too fast out of the strike zone or will snag/grab debris on the bottom of lakes. When fishing lakes, a fly that sinks slowly will often out produce all other patterns. Being able to see the fly and how the fish reacts to the retrieve will teach you a lot about their behavior and what the fish like.
It is early Spring right now and the water temps are fluctuating from the cool night temps. A key for finding big Bluegills in the Spring is to fish drop-offs close to shallow flats. These locations will hold fish most of the year, but in the transition seasons this is the place to be. I like to make a long cast out over deep water, let the fly sink just out of sight and then begin slowly stripping it back. With a floating line, the fly will slowly rise in the water column with every strip. I will try to keep the fly in view if the water clarity allows. As you continue to strip in the fly vary your speed and pause length to keep the fly off of the bottom as not to collect debris. Watch for the fish to actually take the fly or the end of the floating line to twitch and pull. A small strip set is needed and you are in for a battle. Do not be surprised if a large Bass, Catfish, Carp or anything else in the lake is on the other end!
Step 1: Place hook in vise. Start thread one hook eye length back from the eye and wrap back to the hook barb.
Step 2: Cut a short piece of Sparkle Yarn. Starting one hook eye length back from the eye carefully tie the yarn down on the hook shank. Make sure that you create an even base with thread.
Step 3: Cut a short length of 4x tippet (approx. five inches). Tie it down with crossing wraps over top of the yarn and the length hanging out over the tail/back of the hook.
Step 4: Place the tippet in the material keeper back out of way.
Step 5: Lash down Chenille evenly just like with the yarn using even thread wraps. Place the chenille out of the way in the material keeper.
Step 6: Select a properly sized grizzly hackle and strip off fibers from the left-hand side. Tie in the feather about an inch down from the tip. Make sure that the fibers are facing you when you tie the hackle down.
Step 7: Advance your thread toward the eye of the hook, place a half hitch in your thread, and then place it over your bobbin holder.
Step 8: Wrap your Chenille forward evenly using the rotary feature of your vise. Tie off the Chenille making sure not to crowd the eye of the hook. Trim off the Chenille.
Step 9: Place another half hitch in your thread and place back on the bobbin cradle. Carefully wrap your hackle forward with spaced out “candy cane” wraps. Make sure to add an extra turn of hackle right at the head before tying off and trimming the feather.
Step 10: Place a half hitch in the thread again and place on the bobbin holder.
Step 11: Firmly grab the tippet out of the material holder.
Step 12: Wrap the tippet counter wrap style (the opposite direction as the hackle) over the hackle making sure not to trap the hackle fibers down.
Step 13: Tie off the tippet and whip finish your thread at the eye. Create a slightly larger thread head. In this pattern, a larger thread head is an expectation. This thread head is used as a hot spot.
Step 14: Trim the tail to a length just shorter than the hook shank. Add some UV resin to the thread head and your done.
Recipe
Hook: Tiemco 3769 Fly Hooks
Thread: 6/0 Veevus
Tippet (4x)
Aunt Lydia's Sparkle Yarn (Orange)
Chenille-Medium (Tan)
Hook: Tiemco 3769 Fly Hooks
Thread: 6/0 Veevus
Tippet (4x)
Aunt Lydia's Sparkle Yarn (Orange)
Chenille-Medium (Tan)


