Thursday, March 30, 2023

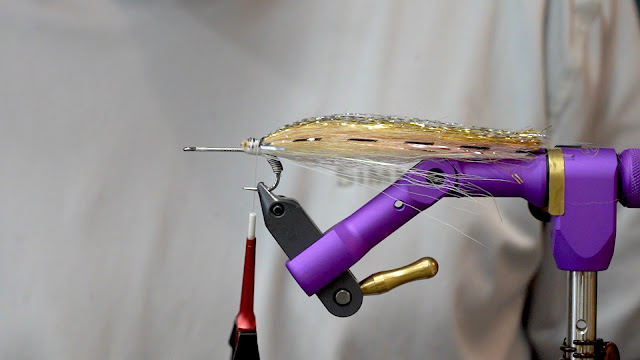
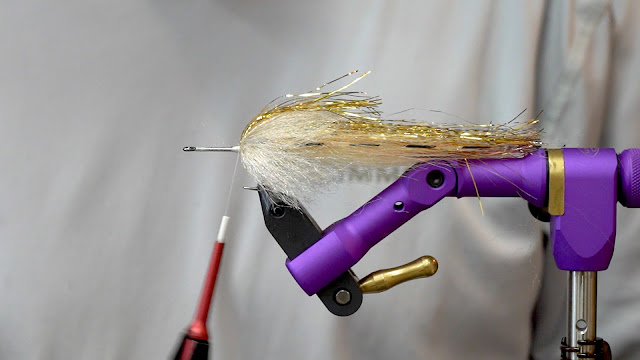
Friday Flies: Murdich Minnow by Pat Kelly

The Murdich Minnow was conceived by Bill Murdich as a saltwater minnow pattern for Striped Bass. As I remember, the popularity of this fly did not begin to spread until it was used for Smallmouth Bass. This was one of the original patterns that started the "modern" smallmouth movement. Shortly before this pattern, it was not common or mainstream to target Smallmouth Bass with large saltwater or baitfish patterns. These fish were mostly approached and treated with a Trout mindset, at least by most fly fisherman. Once anglers realized the attracting and triggering power of bigger minnow style patterns (what would become known as swim flies) it began to change the Smallmouth game for the better and fly anglers began catching giant pre-spawn smallmouth with a lot more regularity than ever before.

As the bigger streamers and swim flies have evolved over the last 15 years the Murdich Minnow's place and purpose has changed for me. Nowadays I use the fly more as a subtle jigging/slow sinking fly that is fished in a more passive manner. I like to fish the fly with either a small snap lift of the rod or hard strip followed by a long pause allowing the fly to slowly sink with the wing and liberal amount of flash parachute as the fly falls through the water. This rise and fall is a very effective trigger in the right water and weather conditions. This fly can be fished with or with out weight. I generally will run weight in the form of lead wire either wrapped around the bend of the hook or placed longways along the shank of the hook, or sometimes both depending on the line I am running or the rate of fall I am trying to achieve. 

Step 1: Begin by laying a foundation of thread from the eye of the hook back down to the bend. Tie in a piece of 0.025 or 0.030 lead wire at the top of the bend and wrap 5-10 times depending on hook size, size of lead, and how heavy you want the fly. Once attached, for security add a strip of UV resin over the lead wraps to insure it does not go anywhere. I like to use resin here as it can be picked off if I decide I no longer want or need it. 


Step 2: Advance thread to directly above the hook point. Tie in a bundle of bucktail and lock in with tight touching wraps back to just above the hook's barb and then return the thread to the original tie in point above the hook point. Select a generous amount of Pearl Flashabou and double it around your thread and tie down. Trim the length of the flash so that it extends just a bit longer than the bucktail. 


Step 3: Select a bundle of Cream X-Select Craft Fur similar in size to the bucktail and tie in directly on top of the bucktail and Flashabou. Once secure, like in the previous step we will top this with more Flashabou. This time it will be a combination of Pink Flashabou and Pearl Lateral Scale blended together.


Step 4: Next, we will repeat what we have already done in the previous couple steps. This time using Tan X-Select Craft Fur and Gold Flashabou. I also add in a strip a Magnum Grizzly/Clear Flashabou as a lateral line. This step is optional, but I think it looks cool. 


Step 5: To finish up the tail section of this fly I take a clump of Senyo's Barred Predator Wrap and tie in on top of the back to add a subtle shading that will surely cause the fly to catch more fish!


Step 6: The collar is the next stage in constructing this fly. Traditionally it is tied with Hareline's Ice Fur. Over the years I started using the Sculpting Flash Fiber Brush 2". It is much faster to tie in and is considerably more durable. In my opinion, the collar was always the weakest part of this fly, so this was a perfect solution. Tie in the brush and wrap forward until you are in front of the tie in point for the tail and tie off. I will spin the fly upside down and trim the fibers away from the underside. This will expose more hook gap and help with the keeling of the fly. 


Step 7: Once the brush is tied off, select a generous clump of Gold Flashabou and fold around your thread and secure so that it extends slightly beyond the collar. Before moving on, I will brush a little Z-Ment onto the flash and collar to help tame and keep the fibers sweeping backwards while the fly is being fished. 


Step 8: As this stage you can add a couple lead strips to the top of the hook shank. This step is optional but will add a little weight and will build up the under body giving the head a little more of a fuller look. Once that is locked in, tie in your Large Cactus Chenille- Bonefish Tan. Using very tight touching wraps, wrap forward all the way to the eye of the hook squeezing as many wraps as possible in the space provided. Before wrapping I tend to lay down a dollop of Z-Ment to help bond the chenille to the hook shank, creating a far more durable fly. 


Step 9: At this point if there are any trapped fibers in the eye of the hook after you tied the chenille off you can take a lighter and singe them away. Once this is done I like to take a gray colored Copic Marker or sharpie and color the top half of the head, giving the fly a little more contrast and character. 


Step 10: If you want to add eyes to your fly, now would be the time to do so. I generally like to use eyes that are approximately 7-8.5mm in size.

Recipe
Hook: Ahrex SA210 Clouser Hook #2
Thread: Veevus 140 Power Thread 
Tail: Bucktail 
Tail 2: Flashabou 
Tail 3: Lateral Scale
Tail 4: Hareline X-Select Craft Fur
Tail 5: Senyo's Barred Predator Wrap- UV Pearl
Collar: Sculpting Flash Fiber Brush 2"
Head: Large Cactus Chenille- Bonefish Tan
Eyes: Flymen Living Eyes 7mm
Marker: Copic Marker- Dark Dun

Thursday, March 16, 2023

Friday Flies: Winter Stone by Ryan Ratliff

Winter hatches in Ohio are very few if existent at all.  Once we get to late winter, the end of February and into March, we see the first hatch that the fish actually key in on.  Winter Stones, Little Black Stones, Snow Flies... they have many different local names.  These small aquatic insects have always gave me hope that the depths of winter are soon to be over.  Showing themselves as small black specks on the snowy bank or crawling up your waders, Winter Stones should find a place in your nymph box anytime you are targeting trout this time of the year.  

Thinking back to a few situations that stand out in my mind, I am reminded of a snowy evening on my local trout stream.  Many years ago I was able to spend a few hours fishing into the evening while large snow flakes fell slowly between the Hemlock and Rhododendron.  I love the quietness of snow falling around pine trees and this place is one of my favorites.  The fishing is what brought me there, but no matter how the fishing was the quietness is really what I was after.  This time I was awakened from the mindless repetition of slowly swinging streamers by a lone rise.  I did a second take and the rings on the water proved my questioning.  Earlier in the evening the snow banks and my waders were crawling with Winter Stones.  I had often seen this event, but never really focused on fishing these flies.  As the snow continued to fall many more rises were happening.  I waded out to the seam just down stream of the rising fish and held my net just under the waters surface.  I quickly saw Winter Stoneflies struggling to get out of the water and crawling up my net.  The next few days I stood waiting in the evenings for more of the Stoneflies to return to the water to drop eggs.  Even though there were plenty of freshly tied dries in my box no more risers were witnessed.  

The dry fly game with Winter Stones is not something to focus on with great success...at least not in this area.  Fishing the nymphs though will provide much greater success.  The nymphs do not swim or drift up to the surface, but crawl out on shore and then hatch.  As they crawl, they fall or get washed into the water.  Trout and Steelhead will key in on these bugs big time.  We will often switch to a black stone when the typical egg bite stops suddenly for Steelhead.  March and a little sun on a riffle is sometimes all it takes to make these bugs wake up from their winter slumber.  Give a Winter Stone a shot when things slow down this time of the year and you will most likely be surprised with the results.

Fly Fishing Film Tour Raffle Items Announced!


One week from today.......Thursday, March 23rd!


We are once again thrilled to be bringing the Fly Fishing Film Tour to Columbus! Held at Studio 35 on Indianola Ave. All proceeds go to benefit Tunnel to Towers Foundation.

Doors open at 5:00 p.m. and the show starts at 7:00 p.m.


Just wanted to get an update out there about the Raffle Prizes which have now been compiled.....


Raffle Information


Raffle Tickets will be $5.00 each or 5 for $20.00. We accept cash, credit card or check. You will be able to place tickets into a separate container for each Grand Raffle Prize individually. General Raffle will be picked from the table as numbers are called.


Grand Raffle Prizes:

* Sage Enforcer 9/10 Fly Reel- $575.00

* Renzetti Traveler Fly Tying Vise- Limited Edition Olive Green- $349.99

* Echo OHS Fly Rod- "One Hand Spey"- 10'4" 7wt- $499.99

* Custom Nautilus XL Fly Reel- $625.00

* Fishpond Canyon Creek Chest Pack- $79.95

* TFO Rod of choice!- ?

* Costa Permit Sunglasses- Green Mirror- $284.00

* Simms Guide Classic Waders- size of choice- $549.00

* Hatch Iconic 4+ Fly Reel- $604.00

* Sage Trout LL 9' 5wt Fly Rod- $925.00

* Fishpond Nomad Guide Net- $199.95

* Simms Dry Creek Rolltop Backpack- $199.95


General Raffle:

* Yeti Bucket

* Simms Taco Bags

* Plenty of Hats and T-Shirts

* Scientific Anglers Amplitude Fly Lines

* Orvis Encounter 9' 5wt Outfit

* Simms Freestone Fly Vest- size Large

* Yeti Water Bottles

* Simms Riverkit Wader Tote

* Some premium fly boxes

* And more!


We'll look forward to seeing you at Studio 35 Next week and look forward to having a blast! Let's come together for a fun evening and raise some monies for a great organization.


833 Bethel Rd.

Columubus, Ohio 43214

614-451-0363

admin@madriveroutfitters.com

www.madriveroutfitters.com

Thursday, March 2, 2023

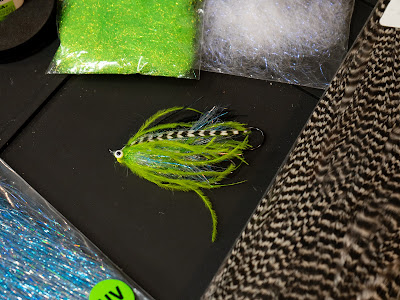
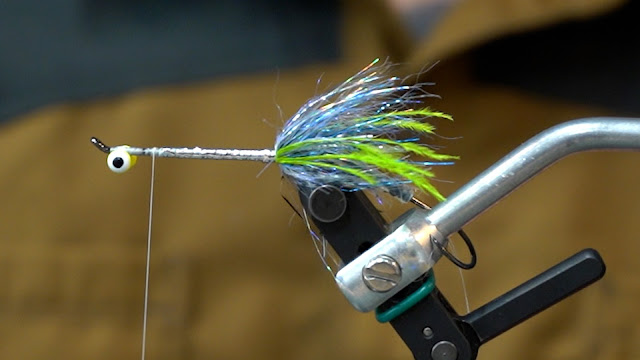
Friday Flies: The Intruder by Paul Johnson


Since Jerry French, Ed Ward and crew created the original Intruder in the early 90’s, it has been a staple pattern in the twohanded world. This pattern can also be incredible even for the single handed caster. What the Intruder focuses on is being sparse yet effective by providing a big presence in the water. I want to start this off by saying that the Intruder is a platform, a general blueprint if you will, for a fly. This means you can use whatever material you would like provided it follows a couple guidelines. The original pattern consisted of a front and rear station and should be tied as sparsely as possible usually with ostrich somewhere in the mix.
 
This specific pattern I tied utilizes a couple different techniques such as dubbing loops, composite loops and tinsel to enhance UV reflectivity. When inserting your material into your loops, make sure that your proportions on either side are consistent, but understand that if something comes out it is okay, it just means that it didn’t want to party. When it comes to wrapping your dubbing loop up past the tinsel I try to make those wraps more open to give space to the tinsel. The thought here is that the UV from your dubbing will bounce off the silver tinsel thus increasing the UV reflectivity which I think is a pretty cool design to this fly without having to add a ton of other materials. Lastly, keep a cup of water near your vise. Wetting your loops will help you get all the material back and keep your wraps tight to each other. The Intruder has built itself upon creativity so don’t be afraid to try different materials, sometimes that can build the best designs!

Far left is for the front shoulder station. Top right is for the back station. The bottom right is the hackle portion for the front station composite loop.

Step 1: Insert a 43mm shank into the vise and lay down a healthy amount of thread.


Step 2: Lash down the braid from your ultra rig kit and work the thread up the shank until you get to the returned eye. Snip the remainder of braid and secure it all down with another layer of thread.


Step 3: Work your thread up to the returned eye. Place the dumbbell eyes on the bottom of the returned eye and secure them in. Wrap your thread to the back of the shank and coat the braid and dumbbell eyes with Z-Ment.


Step 4: Create a dubbing loop about 4-5” inches long but never longer than 5” at the back of the shank. Next run dubbing wax along the thread and grab your Ice Dub/Predator wrap mix for the back station and insert it into the loop slightly off center or other words 60/40.


Step 5: Next use the shepherds hook from your Loon Gator Grip and twist your back station. As Jerry French always says “just add water”. Wet your fingers in a cup of water to help pull the material in your loop back as you proceed to wrap your loop up the shank. After you tie off your loop use your bodkin to poke out any trapped down material and hit it quickly with a dubbing brush.


Step 6: On each side of your shank tie in 2-3 ostrich feathers that stretch slightly beyond your rear station.


Step 7: For this next step, I create a dubbing loop again about 4-5” in length and pin it back to get it out of the way. Next, I tie in large tinsel so when I wrap it up the shank the silver side will show. Move your thread forward leaving a little space behind the eyes.


Step 8: Wrap the tinsel up the shank making sure to lay it down in nice even even wraps slightly over one another. Tie off the tinsel where your thread is behind the eyes.


Step 9: Insert your Ice Dub into the dubbing loop you created at the back station, spin the loop and wrap forward with open wraps up the tinsel. You should have enough to create a small dubbing ball where your tinsel ends behind the eyes.


Step 10: Create a 5” loop for your final composite loop/front station. This will consist of Ice Dub, Predator Wrap and EP Sparkle. Run a healthy amount of dubbing wax on the thread. With one hand open the loop and insert the front shoulder/station so it sits off center or 60/40 in the loop. Once that’s in, place your front hackle into the loop below your shoulder. The front hackle is Ice Dub and Ostrich. Use your bodkin to fix anything that’s too uneven and make sure that your ostrich in your forward hackle sits way off center or 90/10 in the loop. Next twist up your loop!


Step 11: Wet the material while folding it back and palmer it forward with tight side-by-side wraps. You should be able to wrap just the bare thread at the end of the loop past the eyes and secure it down. Use your bodkin again to pick out any material trapped down and give it a good brush forward and back. Do not worry if any material falls out, it just wasn’t meant to be.


Step 12: Tie in 6 pieces of the black ostrich feathers in front of the dumbbell eyes. Make sure the length of the ostrich stretches back to your rear station. This is going to act as the wing of your fly.


Step 13: Next, on each side of the fly, tie in one of the feathers from your grizzly saddles. Make sure the length stretches back to your rear station. I like to have them splayed out from the sides a touch but you can also tie them in so they sit straight back on the sides of the fly.


Step 14: Whip finish and put down a layer of bone dry. Hit the resin with your light and your
intruder is ready to fish!


Recipe:
Thread: Veevus 6/0 (White)
Ice Dub (UV Pearl, Blue & Chartreuse)
EP Sparkle (Blue)
Ostrich Plumes (Chartreuse & Black)
Mylar Tinsel (Large)