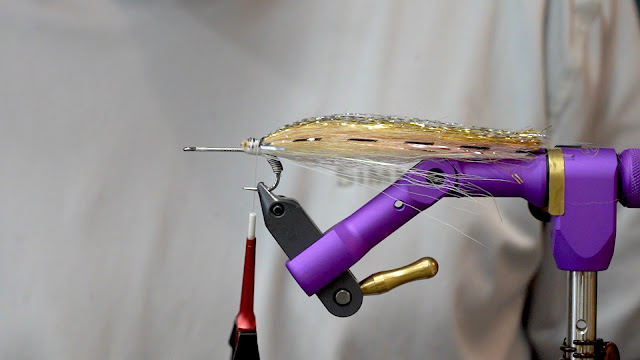
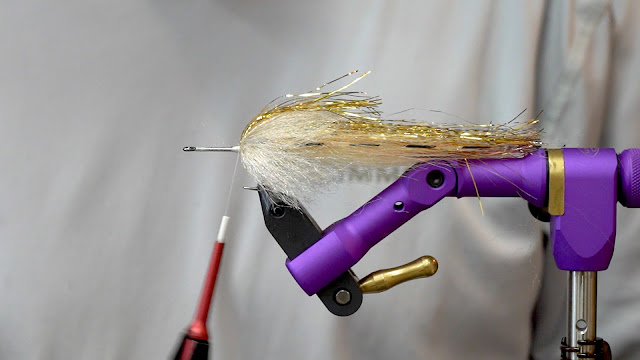
The Murdich Minnow was conceived by Bill Murdich as a saltwater minnow pattern for Striped Bass. As I remember, the popularity of this fly did not begin to spread until it was used for Smallmouth Bass. This was one of the original patterns that started the "modern" smallmouth movement. Shortly before this pattern, it was not common or mainstream to target Smallmouth Bass with large saltwater or baitfish patterns. These fish were mostly approached and treated with a Trout mindset, at least by most fly fisherman. Once anglers realized the attracting and triggering power of bigger minnow style patterns (what would become known as swim flies) it began to change the Smallmouth game for the better and fly anglers began catching giant pre-spawn smallmouth with a lot more regularity than ever before.
As the bigger streamers and swim flies have evolved over the last 15 years the Murdich Minnow's place and purpose has changed for me. Nowadays I use the fly more as a subtle jigging/slow sinking fly that is fished in a more passive manner. I like to fish the fly with either a small snap lift of the rod or hard strip followed by a long pause allowing the fly to slowly sink with the wing and liberal amount of flash parachute as the fly falls through the water. This rise and fall is a very effective trigger in the right water and weather conditions. This fly can be fished with or with out weight. I generally will run weight in the form of lead wire either wrapped around the bend of the hook or placed longways along the shank of the hook, or sometimes both depending on the line I am running or the rate of fall I am trying to achieve.
Step 1: Begin by laying a foundation of thread from the eye of the hook back down to the bend. Tie in a piece of 0.025 or 0.030 lead wire at the top of the bend and wrap 5-10 times depending on hook size, size of lead, and how heavy you want the fly. Once attached, for security add a strip of UV resin over the lead wraps to insure it does not go anywhere. I like to use resin here as it can be picked off if I decide I no longer want or need it.
Step 2: Advance thread to directly above the hook point. Tie in a bundle of bucktail and lock in with tight touching wraps back to just above the hook's barb and then return the thread to the original tie in point above the hook point. Select a generous amount of Pearl Flashabou and double it around your thread and tie down. Trim the length of the flash so that it extends just a bit longer than the bucktail.
Step 3: Select a bundle of Cream X-Select Craft Fur similar in size to the bucktail and tie in directly on top of the bucktail and Flashabou. Once secure, like in the previous step we will top this with more Flashabou. This time it will be a combination of Pink Flashabou and Pearl Lateral Scale blended together.
Step 4: Next, we will repeat what we have already done in the previous couple steps. This time using Tan X-Select Craft Fur and Gold Flashabou. I also add in a strip a Magnum Grizzly/Clear Flashabou as a lateral line. This step is optional, but I think it looks cool.
Step 5: To finish up the tail section of this fly I take a clump of Senyo's Barred Predator Wrap and tie in on top of the back to add a subtle shading that will surely cause the fly to catch more fish!
Step 6: The collar is the next stage in constructing this fly. Traditionally it is tied with Hareline's Ice Fur. Over the years I started using the Sculpting Flash Fiber Brush 2". It is much faster to tie in and is considerably more durable. In my opinion, the collar was always the weakest part of this fly, so this was a perfect solution. Tie in the brush and wrap forward until you are in front of the tie in point for the tail and tie off. I will spin the fly upside down and trim the fibers away from the underside. This will expose more hook gap and help with the keeling of the fly.
Step 7: Once the brush is tied off, select a generous clump of Gold Flashabou and fold around your thread and secure so that it extends slightly beyond the collar. Before moving on, I will brush a little Z-Ment onto the flash and collar to help tame and keep the fibers sweeping backwards while the fly is being fished.
Step 8: As this stage you can add a couple lead strips to the top of the hook shank. This step is optional but will add a little weight and will build up the under body giving the head a little more of a fuller look. Once that is locked in, tie in your Large Cactus Chenille- Bonefish Tan. Using very tight touching wraps, wrap forward all the way to the eye of the hook squeezing as many wraps as possible in the space provided. Before wrapping I tend to lay down a dollop of Z-Ment to help bond the chenille to the hook shank, creating a far more durable fly.
Step 9: At this point if there are any trapped fibers in the eye of the hook after you tied the chenille off you can take a lighter and singe them away. Once this is done I like to take a gray colored Copic Marker or sharpie and color the top half of the head, giving the fly a little more contrast and character.
Step 10: If you want to add eyes to your fly, now would be the time to do so. I generally like to use eyes that are approximately 7-8.5mm in size.
Recipe
Hook: Ahrex SA210 Clouser Hook #2
Thread: Veevus 140 Power Thread
Tail: Bucktail
Tail 2: Flashabou
Tail 3: Lateral Scale
Tail 4: Hareline X-Select Craft Fur
Tail 5: Senyo's Barred Predator Wrap- UV Pearl
Collar: Sculpting Flash Fiber Brush 2"
Head: Large Cactus Chenille- Bonefish Tan
Eyes: Flymen Living Eyes 7mm
Marker: Copic Marker- Dark Dun


