After 3 years off, for obvious reasons, we are excited to announce that our Education Program is back up and running. Back, and better than ever!
Education has always been the cornerstone of our business and it feels good to be back in the business and we look forward to seeing you all in some schools or classes in the near future.
The Super Shad is my take on the ever popular Zoom Super Fluke. For anyone who doesn't know, the Zoom Super Fluke is a soft plastic jerkbait. It was designed to swim in a very erratic fashion when pulled on and also look like a dying baitfish on the pause. It doesn't take fishing the Super Fluke very long to figure out that fish love to eat this lure after it is stopped. By playing a game with the overall weight of the hook, you could determine how fast or slow the fluke would sink at rest. Getting this sink rate dialed in on any given day often times is the difference between that bait catching a fish or two or that bait flat out putting the smackdown on fish.
When I first started playing around with this fly pattern, I wanted the fly to sink in a way that closely resembled the Super Fluke. That is, rather than a head dive, I wanted more of a horizontal shimmy. If you look at the tail design of this fly the saddles are tied in "tented style" which means they come together like an upside down V. When tied this way it allows the feather to cup and cradle water as it drops through the water column. This creates a really nice wobble or roll to the fly on the way down. Also, to increase the amount of water being grabbed while sinking, I added a stiff pair of flank feathers resembling Galloup's Zoo Cougar or Schultzy's Swingin' D right off the back of the fly. This also aids in the flies ability to rock and move in a side to side fashion while sinking. The head design was simple. I knew I wanted it to be shaped mostly flat and fairly tall like a shad. The durability and ease of shaping you can achieve with a brush made it the obvious choice. Through trial and error I realized the fly's head was not dense and buoyant enough. It would either sink to quickly head first, causing the fly to sink to vertically or the head was too buoyant and wouldn't sink enough. Through more research and talking with some people far more talented than myself (Blane Chocklett and Mike Schultz) I learned about the use of the EP Crustaceous Brush. This brush brought the perfect combination of density and buoyancy to the fly and was responsible for achieving the horizontal fall I desired. Now, once on the water you can refine and dial in the sink rate further with the use of keels and varying amounts of lead wire around the bend of the hook.
Step 1: Insert a 20mm shank into your vise and lay down a solid foundation of thread from front to back.
Step 2: Tie in Chocklett's Finesse Chenille- Large and wrap very tight side by side wraps until you reach the middle of the hook and tie off.
Step 3: Tie in 2 to 3 saddles on each side of the hook, favoring the upper part of the hook shank. When tying in you want each set of feathers to angle in and lean into each other so that once tied in they resemble a tent or and upside down V.
Step 4: Marry two schlappen feathers together and and palmer them up the remainder of the shank and tie off.
Step 5: Select two straight Mallard or Silver Pheasant Flank feathers. I can not overstate the importance of getting two straight symmetrical flank feathers. This will play a big role in the action of the fly being right and not twisted or out of balance.
Step 6: Insert the SA280 #2/0 hook into your vise. At this time you can attach and wrap your .025 lead wire to the bend or after the fly has been tied and your on the water. It's nice having the flexibility to dial in your keel weight once you are on the water fishing but once you tie this fly enough you'll just know how much lead wire you will need to make the fly ride the way you want in the water. Tie in your articulation wire on top of the hook and secure it down into the bend just enough so that when you bring it back around to secure it, your loop sits flush with the eye of your hook.
Step 7: Select a long webby schlappen feather and tie in with a piece of UV Gold Polar Chenille- large. Before you wrap this up the hook you will want to spin the two together creating a "brush" or what some people call a "complex twist". This is an old Lefty Kreh trick that makes for an easier and more durable fly. Once twisted together, palmer using tight side by side wraps up the hook shank until you reach just above the hook point and tie off.
Step 8: Cut off several bundles of craft fur and hand stack them together so the tips are somewhat aligned. Lay on top of the hook reverse style with the tips pointing forward and distribute the material evenly 360 degrees around the hook. You'll want to leave a fair amount of the butts on the craft fur as it will serve as a nice support for the longer fibers when you pull them backwards into place. Pull the fibers backwards and secure with thread wraps creating what is known as a "bullet tie"
Step 9: This step is totally optional but I think it adds a nice look and texture to the fly. Select the largest and widest Mallard Flank feather you can find and tie in by the tip and palmer over the "bullet tie". This will add a nice mottled effect to the finished fly.
Step 10: Tie in the EP Crustaceous Brush just in front of your bullet tie of craft fur. Make touching side by side wraps all the way forward until you reach the eye of the hook and tie off. Pick out any of the fibers that became trapped during the wrapping process. Take your time with this and make sure all the fibers are brushed and picked out as it will make trimming much easier.
Step 11: Make a couple of rough cuts along the side (cheeks) of the fly. This will begin to create the tall flat profile. When the sides are cut somewhat flat lay down a small dollop of Loctite Gel and glue 3D eyes into place.
Step 12: Once the eyes have been glued into place, use your scissors and start to trim the head of the fly. Take your time and think about the shape you are trying to achieve. Little by little the shape will come to you. When you are finished, walk away from the fly before you cut too much off and you have to start all over!
Mad River Outfitters is once again bringing the F3T to Columbus, Ohio. This year will be held at Studio 35 theater and the proceeds from the event will benefit Tunnels to Towers Foundation. Tickets are available exclusively at www.madriveroutfitters.com or in the shop.
The 17th annual FLY FISHING FILM TOUR (F3T) presented by Costa, YETI, and Simms is back in action and hitting the road with a top notch selection of short films that are sure to get you fired up for the season ahead.
The 2023 show will feature locations from Cuba to Patagonia, Mexico to Australia, Alaska, Wyoming, the Deep South, Massachusetts and beyond. Experience the achievement of a permit slam, follow the journey of one boy from Mexico to the waters of Wyoming, explore the best international waters and compete for the legendary belt buckle. Join us for a journey of adventure, friendship and the best fly fishing action.
The F3T is the original and largest fly fishing film event of its kind. Come for the action and stay for the giveaways and camaraderie that will feed your fishing addiction.
Proceeds
Majority of the proceeds go to benefit our friends at Tunnel to Towers.
On September 11, 2001, FDNY firefighter Stephen Siller laid down his life to save others when America was attacked. For over 20 years, the Tunnel to Towers Foundation has honored Stephen's legacy by supporting the heroes who continue to risk life and limb in the line of duty.
To honor the lives lost on September 11, 2001, the Tunnel to Towers Foundation developed the In the Line of Duty Program, which provides mortgage-free homes to our nation's catastrophically injured veterans and first responders, and Gold Star and fallen first responder families with young children.
Smart Home Program- the foundation custom builds specially adapted mortgage-free smart homes that help our most catastrophically injured veterans and first responders to reclaim their day-to-day independence. Fallen First Responder Program- the foundation pays-off the mortgages for the families of law enforcement officers and firefighters who are killed in the line of duty with young children. In 2021, T2T expanded the program to support the families of first responders who have lost their lives to 9/11 illnesses. Gold Star Familyl Home Program- the foundation honors the legacy of those who have made the ultimate sacrafice while serving our country by paying off the mortgage or providing the surviving spouses and young children with mortgage-free homes. Homeless Veterans- In 2022, T2T launched a new national campaign aimed at eradicating homelessness in the Veteran community. Never Forget Programs- on September 11, ,2001 nearly 3,000 people lost their lives as a result of terrorist attacks. We pause to remember those who lost their lives and those who continue to suffer by vowing to "Never Forget".
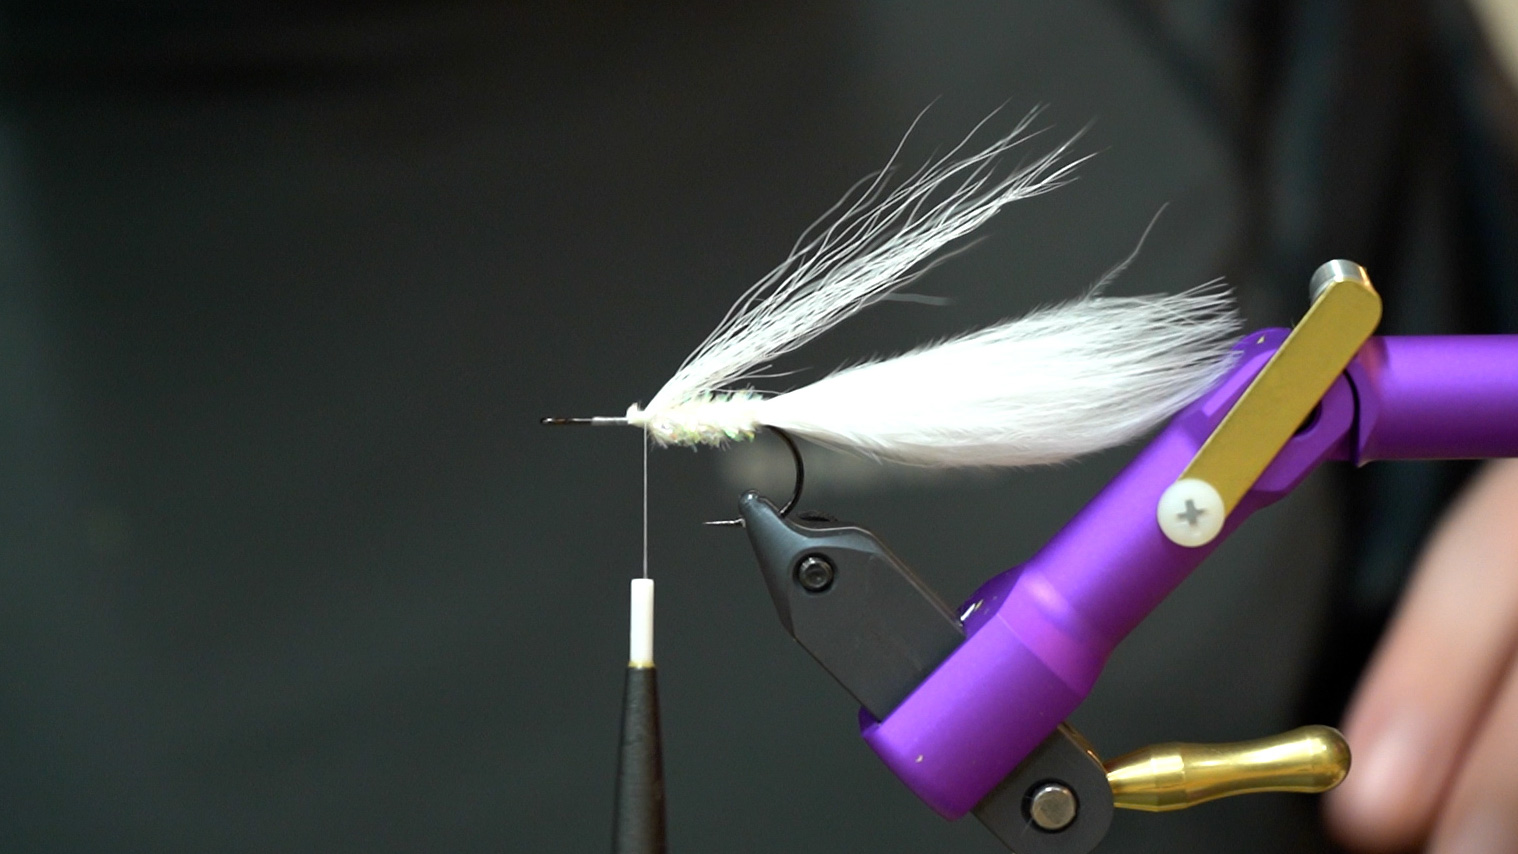
Dahlberg's Flashdancer is a fly that should need no introduction but it certainly is less popular and not nearly as well known as the Dahlberg Diver, which is arguably the greatest topwater contribution to the world of fly fishing. However one statement that can not be argued, in my humble opinion, is that Larry Dahlberg has and is the greatest mind in fishing PERIOD! As a young child, I can remember watching and recording every Saturday, on VHS I might add, Larry's Hunt for Big Fish. This show as well as The Walker's Cay Chronicles were single handedly responsible for shaping the course of my life. I can remember certain segments where Larry wold tie flies or talk about certain patterns. Several of them stuck with me but I can vividly remember the Flashdancer and the underwater footage of it swimming and rebounding through the water column. It was completely mesmerizing! I had never seen anything like it up to that point in my life and I immediately had to learn how to tie it so that it could be applied in my day to day fishing. After many failed attempts at tying the fly and struggling with the deer hair portion I finally got one that seemed like it would work. I can distinctly remember that the few rivers close to me at the time were high and muddy so I had to sit and stew in my excitement and anticipation for several days. After finally being able to get out on the water, I had the chance to see this fly in action, it did not disappoint. It was unlike anything I'd seen or fished up to that point and I believe it was responsible for changing the way I perceived certain things from that moment forward.
This fly can be tied in a variety of sizes and with a variety of different hook styles. It can also be fished with either a floating or modern style sinking or intermediate fly line. In fact I recommend fishing it with both and learning how the fly shines and can be fished and applied differently based on the line it is being fished on. Either way you do it just make sure you tie a few up in different sizes and colors and fish it!
Step 1: Begin by laying down a solid base of thread from the eye extending back to just above the barb.
Step 2: Select one or two plumes of marabou approximately two hook shanks long. Tie in and secure above the barb. Wrapping over the marabou up the hook shank about half way. Securing the marabou further down the shank will ensure the material does not spin and rotate over time, making for a more durable fly.
Step 3: Return thread to the original tie in point just above the hooks barb and tie in the Speckled Crystal Chenille. Before lashing down the chenille, it helps to strip away some of the material exposing the thread core. Tying down by this core is much cleaner and will give you a more secure tie in. Wrap chenille about half way up the remaining shank and tie off.
Step 4: Select a very sparse bundle of bucktail and tie in just in front of your chenille. This piece should extend about 3/4 of the way along the marabou tail. A little tip that can result in a more durable fly would be to lay down just a small dollop of Z-Ment to the hook shank before tying down the bucktail. This is totally optional, but goes a long way with the durability of the fly.
Step 5: Select a generous bundle of flashabou (remember this is the fly's name sake, so it would be difficult to have too much) and fold the material in half. Once folded in half, take the flashabou and fold in half one more time, this time folding it around your thread, secure to the top half of the hook shank. It should rest on top of and slightly blend in with the bucktail wing below it.
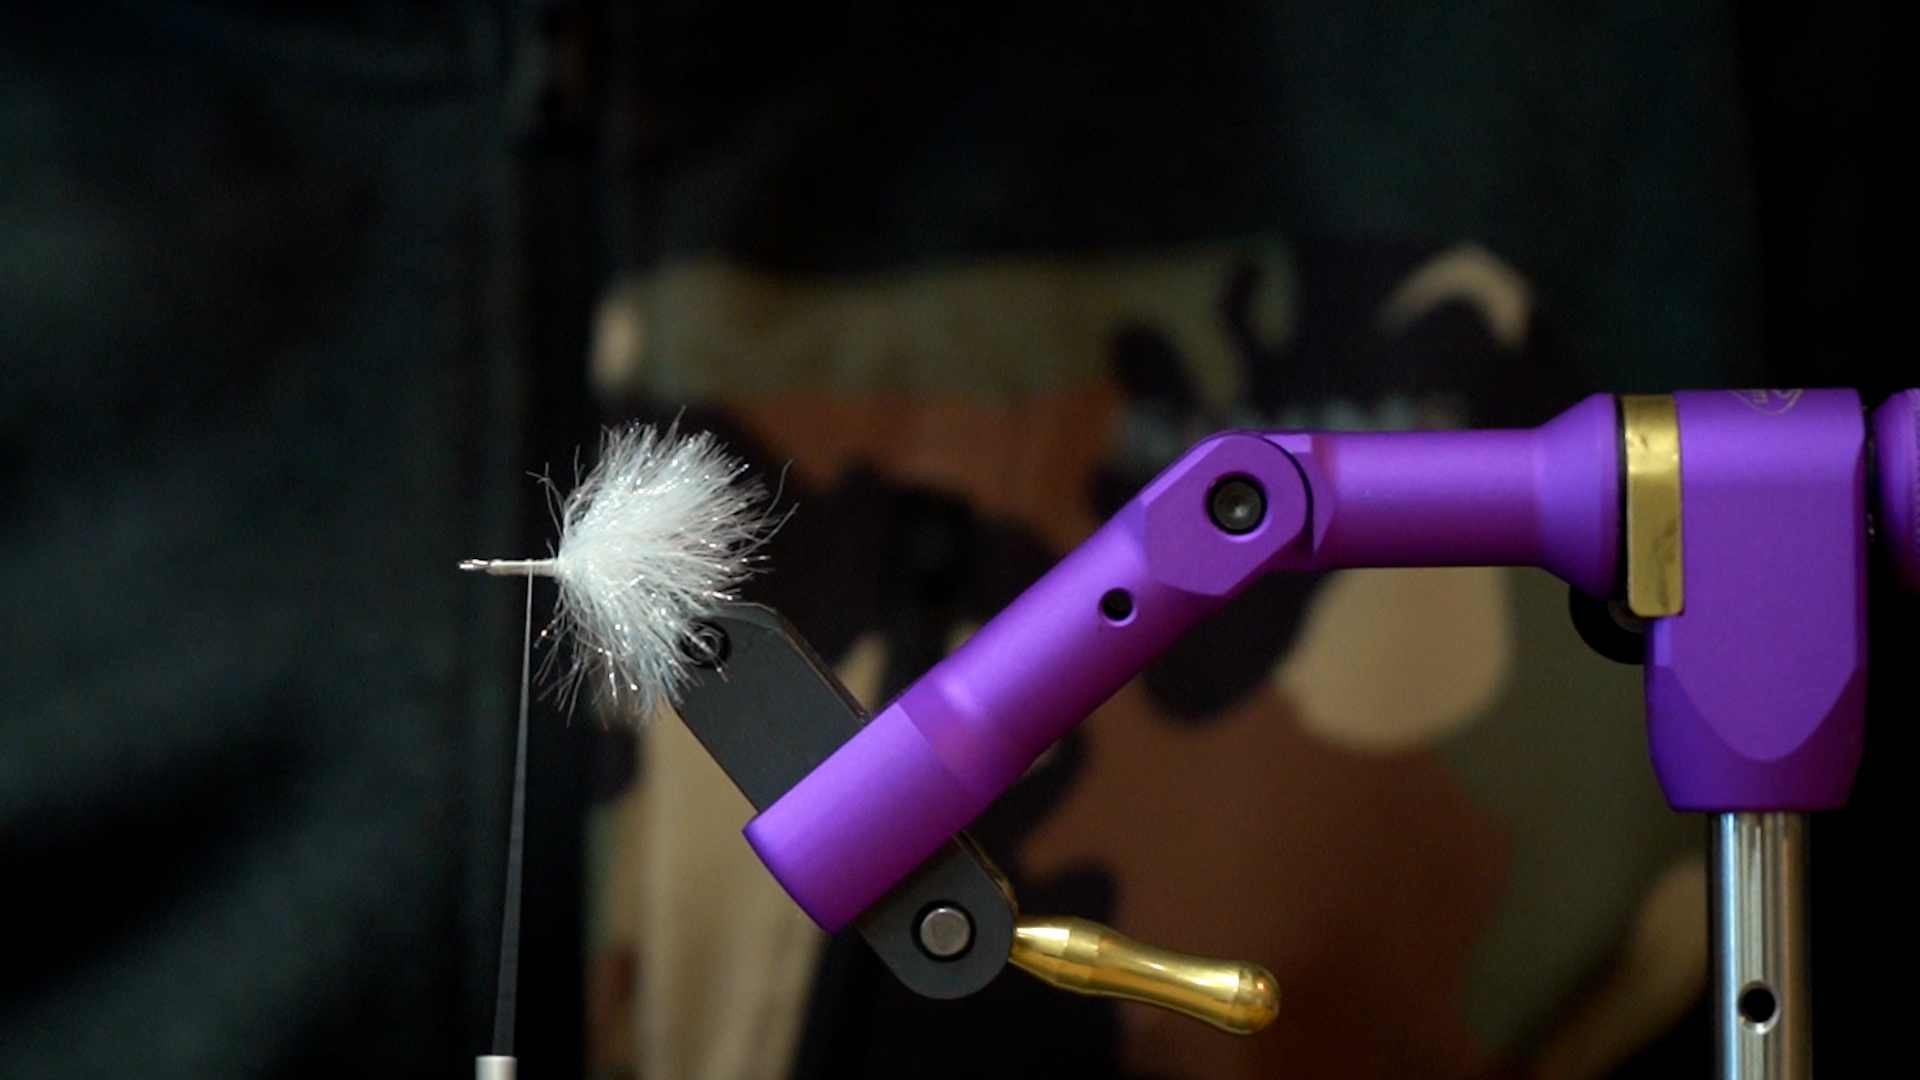
Step 6: Select about a pencil width worth of deer hair (can be body or belly depending on how much buoyancy and recovery you want in the fly) and slide into a hair stacker tips down. Once firmly stacked, carefully remove the hair trying to keep the tips as even as possible. When tying down the hair, you want the tips to extend to approximately between the barb and the bend of the hook. Lay down another small drop of Z-Ment. Holding the hair with your material hand, cut the butts flush, giving yourself just enough material to grab with your thread. Make two or three loose wraps then tighten down. If done properly you will be left with what looks like the perfect Elk Hair Caddis head. Advance your thread in front of the butts and prepare for the next steps.
Step 7: Select another pencil width bundle of hair and spin evenly 360 degrees around the hook shank. Advance thread in front of hair and repeat this step one more time with the same amount of hair. If the amount of hair and spacing is correct this will bring to the eye of the hook. Whip finish and finish your thread head with Z-Ment of your favorite fly tying glue.
Step 8: Bend a double sided razor blade and with a rounded upward motion, sweep the blade back and stop before you reach the collar. Move carefully and slowly as to not cut your collar off. The shape you are going for is a Zoo Cougar style head or a larger broader version of a Muddler.
Step 9: Once the top half of the fly looks the way you want, flip the fly over and make a flat straight cut on the bottom half. Stabilizing your cutting hand will help ensure your cut is nice and even.
Step 10: Most of the cutting should be done at this point. Scissors are a great way to nock off any edges and smooth things over before calling it a finished fly. Careful not to over do it with the scissors. If you have OCD it can be easy to keep cutting until the is nothing left.


.jpg)