Howdy Friends, Brian Flechsig here! As stated in the video on this fly, I have been working the past year on getting my fly boxes organized. Quite the task but it is coming along.
I was recently working on my sculpin box and came up with a few new patterns that have worked well for me, so I thought I’d share them here.
I haven’t named any of them yet... So we are just calling this Sculpin #1. It is based on the Mike Lawson Wool Head Sculpin that we sold here in the shop for many years and was a staple. It is no longer available commercially so I had to figure out a way to tie it myself. Pretty similar, although my version of the fly rides hook up, where the original did not.
I tie this fly in both olive and brown. The Olive is patterned here but easy to change up the colors.
Here's the materials you'll need to tie your own:
Hook: Any 3X long streamer hook- used in this video is the Umpqua U Series U301 - Size 4
Thread: Ultra Thread 140 denier- olive or brown
Weight: .030 Lead Wire
Tail: Magnum Rabbit Strip
Underbelly: Olive Ice Dub
Body: Cross-Cut Rabbit Strip - Olive
Overbody/Hackle: Whiting Coq De Leon - Speckled Olive
Pectoral Fins: Whiting Coq De Leon- Speckled Olive (Can use most any appropriate Speckled or Grizzly Hen Saddle if you don’t have the Whiting product)
Head: Sculpin Wool - Olive
Finish: Loon UV Epoxy - Thin
Let's get started:
Place the hook in the vise and start your thread as you normally would. Laying a base of thread along the hook. Wind up with the thread back at the front of the hook behind the eye.

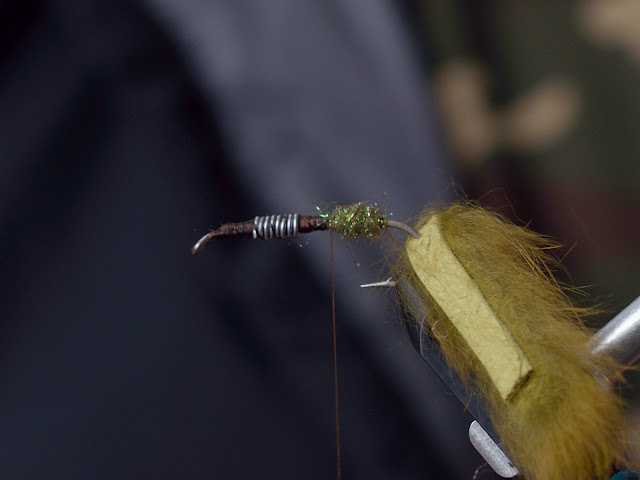
Place a strip of .035” Lead Wire along the top of the hook shank, the length of the shank, and tie it in. This ensures that this fly will ride hook up, which is how this fly is designed/tied.

- Then cover over top with spirals of lead, 6-8-10 (however heavy you want the fly), wrapped in the front half of the hook shank. Cover the lead with thread wraps and also create the typical “ramps” in front of and behind the lead wrapping. Coat with Zap-a-Gap or Loctite to secure the lead and thread. Wrap the thread back to the bend and let the glue dry.

- Cut a piece of Magnum Rabbit Strip of appropriate length. Measure back from one end about that same length…..bend to point on the hook, and pierce the strip at that point, hide side up. You will need to remove the hook from the vise in order to do this. Put the hook back in place.

- Dub a tapered belly with the ice dub, about the length from the bend to where the point of the hook is. Maybe a pinch more? Leave the thread at this point.
- Bring the Magnum strip into place, at the bend of the hook, and secure the other end with the thread, which is hanging just beyond the hook point. Make sure that the hide is up and the hair down (remember, you are tying this upside down).

- Tie in a piece of Cross-Cutt Rabbit Strip. Advance the thread forward to about the ¾ point on the hook shank or even a pinch closer to the eye? Palmer the rabbit strip forward, being sure to stroke the hairs back each time you wrap over. Tie off the rabbit after about 4-5 turns.

- Select a large Coq De Leon Hen Saddle Feather. Grab the tip with some tweezers and create a “V” shape at the tip. Tie this in by the “V” on the underside of the hook shank….right where your thread is haning.

- Take 4-5 wraps of the feather, again, stroking the fibers back each time you wrap over. You can now wrap the thread back over this feather and rabbit to ensure you that you have enough room at the head for the pec fins and the wool head.

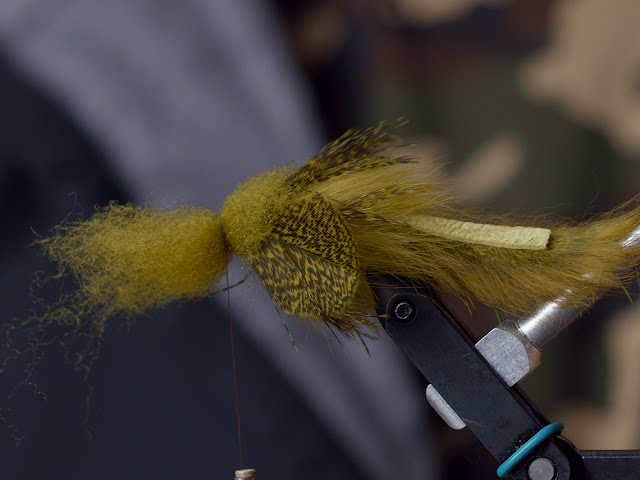
- Select two large Coq De Leon feathers for the pectoral fins. Measure both accordingly and strip off the barbules and fluff from the stem. Tie in on each side of the fly.

- I typically then pull them “down” to get better placement, Remembering that this fly will ride hook up and you are tying on the bottom at this point. Moving them down at this step, will ensure they ride more “up” when the fly is fished. Once in place, put a dab of Zap-a-Gap or Loctite over the stems/tie in and put a few extra security wraps of thread.

- Cut off a hunk of Sculpin Wool. Take the butt end that you cut, place on top of the hook shank at the head and position the wool around the shank so that about half is on the underside and half on the top. Tie this in just behind the eye with a few wraps of thread.
- Rotate your vise or remove the hook and put it back in upside down.
- Take the longer wool fibers on top and fold them back, and spread them out a bit, then tie the head of the fly, wrapping back over the wool in the process to lay it back.

- Then, using your thumb and index finger, form a “sculpin looking head” with the wool. While holding in place, take the thin UV and apply just a bit at the head and back into the wool a bit. Cure with a UV light. (Remember this is the top of the fly at this point….so more rounded).

- Rotate the fly again and do the same on the underside, forming a more flat underside to the head. Hit with the UV light.

- If you feel you need more formation of the head, you can add a bit more UV, working back into the wool a bit, both top and bottom.
- Use a pair of curved scissors to trim the excess wool into a head shape….just being sure that you don’t trim the Pectoral Fins or any of the hackle feather that you tied in.


That’s it!!!! Pretty Easy.

Give it a shot, watch the video, and let me know if you have any questions.
Watch the full video here:
