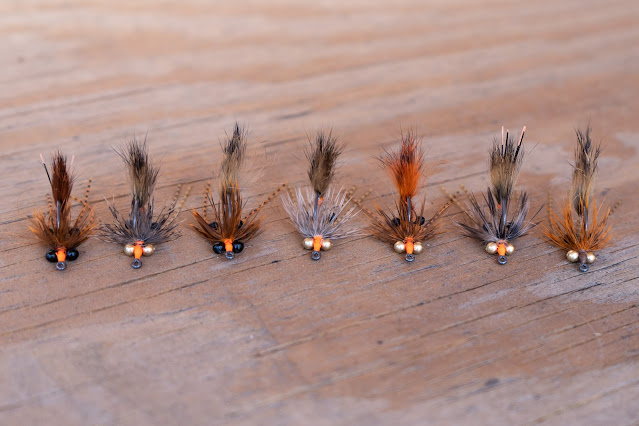
As much as I would love to tell you a fun filled story regarding the conception and development of the "Carpinator" one simply does not exist. The fly came from a book called Carp on the Fly, written by Brad Befus, Barry Reynolds, and John Barryman. By my estimation, this may very well be the best published book on the topic. This book set the standard and came out unapologetically. These guys were targeting carp and writing about it before people knew it was something that could be done. At some point they stopped printing this book and it was off the market for many years. I am happy to say that now, the book is available again Carp On the Fly. For whatever reason that fly was removed when the book was re-published. Since my original copy of the book is long gone I begin to doubt that it came from the book at all. I guess I'll never know.
What I can say is it is without a doubt my favorite Carp fly of all time. I have made some tweak's and adjustments to improve an already stellar fly. This pattern has the unique ability to land on the water softly, sink quickly, and always lands upright on the bottom, no matter what. It can be tied in whatever color you can ponder and sizes can be adjusted to the situation at hand. In most cases, I tie it in sizes 4, 6, and 8 and use either medium or large bead chain eyes for the weight. I predominately target carp in slower moving rivers and streams so I have no need for a larger/heavier version.
Step 1: Start your thread just behind the eye of the hook and make touching wraps to half way down the bend of the hook.
Step 2: Snip a bundle of rabbit fur off the hide and tie in so that it rides along the bend of the hook. Make sure the beginning of your tie in point is below the shank of the hook. This will be important and explained in the next step.
Step 3: The bump created by the rabbit's tie in point will create the platform by which you will mount the mono eyes. The placement and location of the mono eyes is critical to the fly landing and staying upright once it reaches the bottom and to ensure the current doesn't knock it over.
Step 4: Once the mono eyes are secured return thread to the bottom of the tail and begin to dub a noodle of Crawdub, doing your very best to keep the amount of dubbing to a minimum. This will ensure the fly sinks quickly through the column with minimal weight. Wrap the dubbing up the hook, figure 8ing around the mono eyes and half way up the hook shank.
Step 5: Advance your thread up the shank to just behind the eye of the hook and secure the bead chain eyes. Once secure, take two rubber legs at full length and fold around your thread and secure, walking your thread back to where the dubbing left off.
Step 6: Once the legs are secure, dub your way up the remainder of the hook to just behind the eyes.
Step 7: Take a saddle from the middle of the patch. Hold by the tip and stroke the fibers downward toward the base of the stem. By doing so you will leave a small tag that you can use to tie in and secure the feather before wrapping the collar. One thing to note when tying in the feather, it pays to secure the feather so that the concave side of the feather is facing in towards the fly and facing slightly backwards. This will help make sure the fibers lay backwards when palmering your feather.
Step 8: Once the feather is palmered, tie off and secure. Advance thread to in front of the bead chain and secure with a whip finish.
After that, take the fly out of the vise and rub it around in the river bottom before fishing. Doing this can remove your human scent and will help you convert more carp. Hope this helps you out and thanks for reading!
Recipe
Thread: Veevus 6/0: Color of choice
Hook: Daiichi 1650 #4
Black Barred Rabbit Strips: Gold Variant
Krystal Flash: Rootbeer
Medium Mono Eyes: Black
Crawdub: Tan
Large Bead Chain Eyes: Gold
Sili Legs Nymph: Barred Pumpkin
Soft Hackle Hen Saddle Patch: Brown


